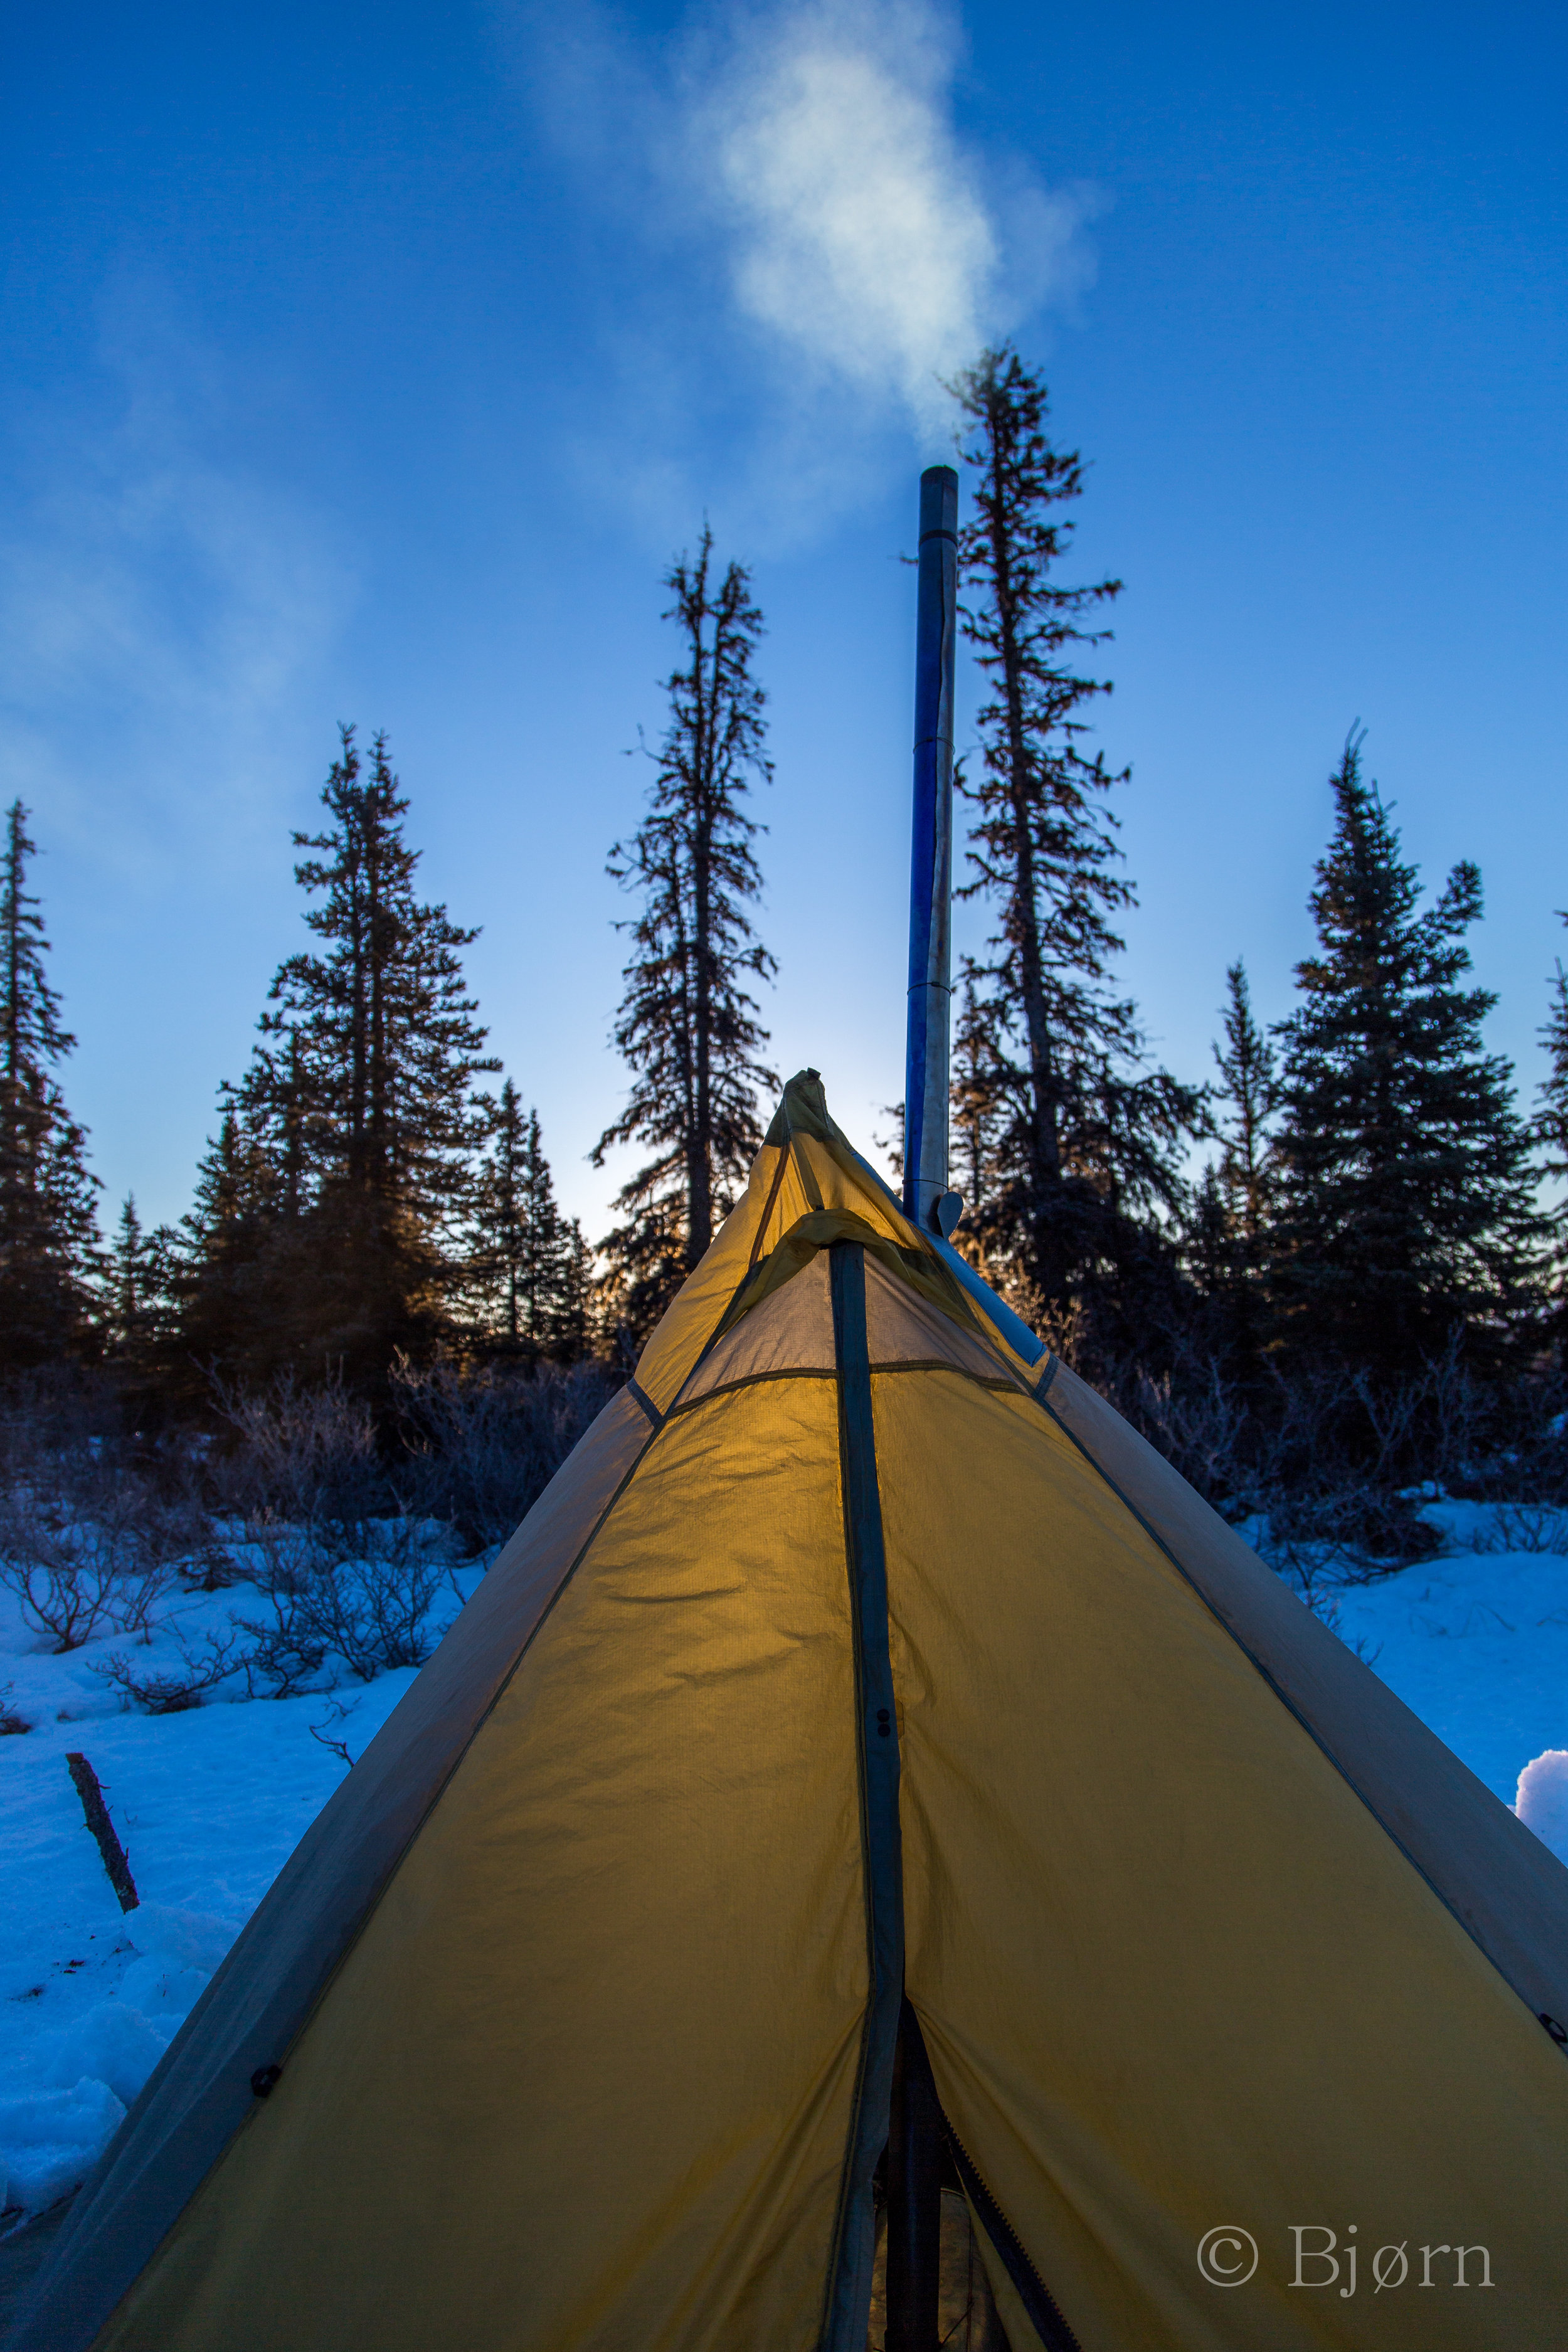
Before we embarked, Kim and I spent time trialing our Mountain Laurel, floor-less, mid shelter with the Titanium Goat, wood burning, barrel stove but this arrangement was still largely theoretical. After 5 weeks of near daily use, we are beyond theory and into the realm of the actual.
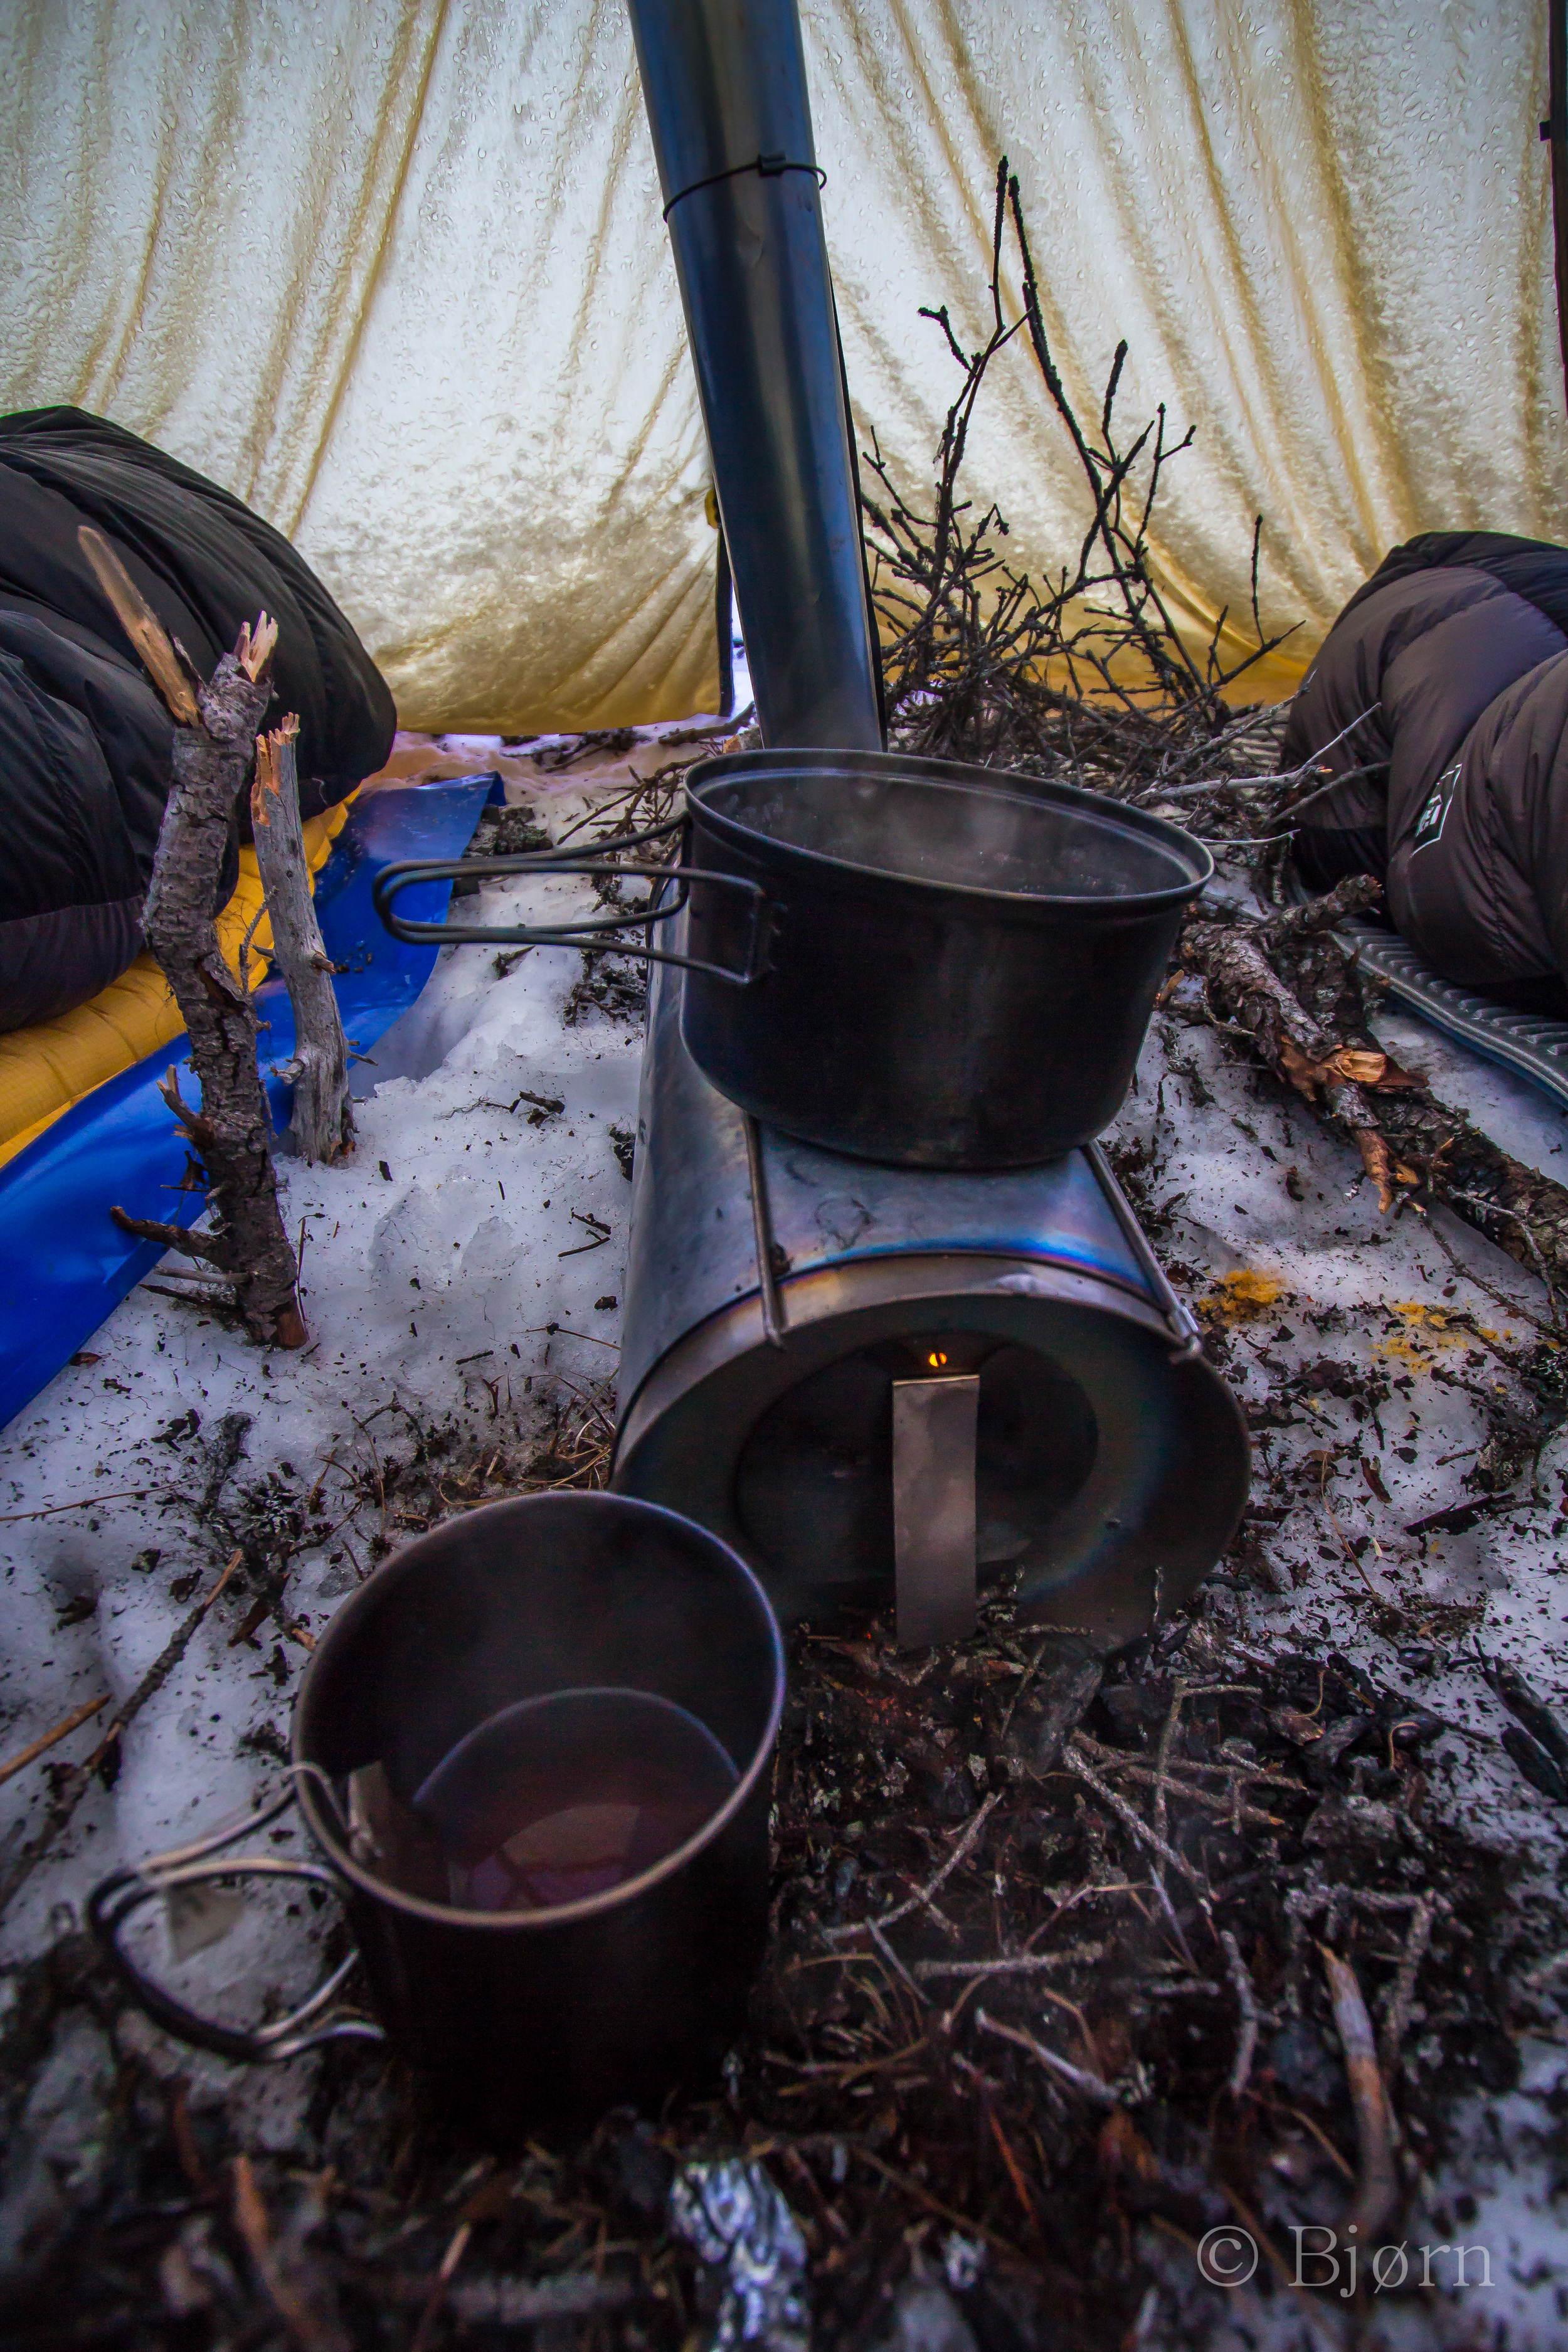
We opted to rely solely on the wood stove for our water making and food cooking and left our MSR Whisperlite with friends to send if we decided we needed it. Using the wood stove to make water and cook on takes longer than a gas stove but our routine with the stove proved to be a nearly ideal arrangement.
In the evening we would both work together to erect the shelter. This chore consisted of strapping together two collapsible ski poles, handle to handle, with the tips on the end. We used two Voile straps, which are stretchy and very secure. (More about Voile straps later.) Then we would harvest four stakes from whatever was available. Typically, this was willow, spruce or birch branches. Then, Kim would hold the center pole within the shelter, while I set the stakes. Once the shelter was secure, we would either cut snow blocks or scoop loose snow around the perimeter “skirt” that I had sewn onto the shelter.
With the shelter erected, we each set out on our individual chores, which alternated daily. One of us would assemble the collapsible bow saw and harvest enough wood for the evening and morning. Relying on the wood stove establishes parameters as to where we decided to set a camp. We preferred to be in spruce forests, as dead spruce is the best fuel for the stove. That said, dead and dry willow or alder works very well too. The only fuel we tried to avoid was birch. Even when birch is well cured, it still contains moisture and does not burn hot enough. A typical strategy was to cut down long pieces and chuck them near the shelter. Once a healthy pile had been gathered we would make ourselves comfortable and cut the wood into sub-22 inch lengths. Lastly, we would bring the wood inside the shelter and stack it into a pile.
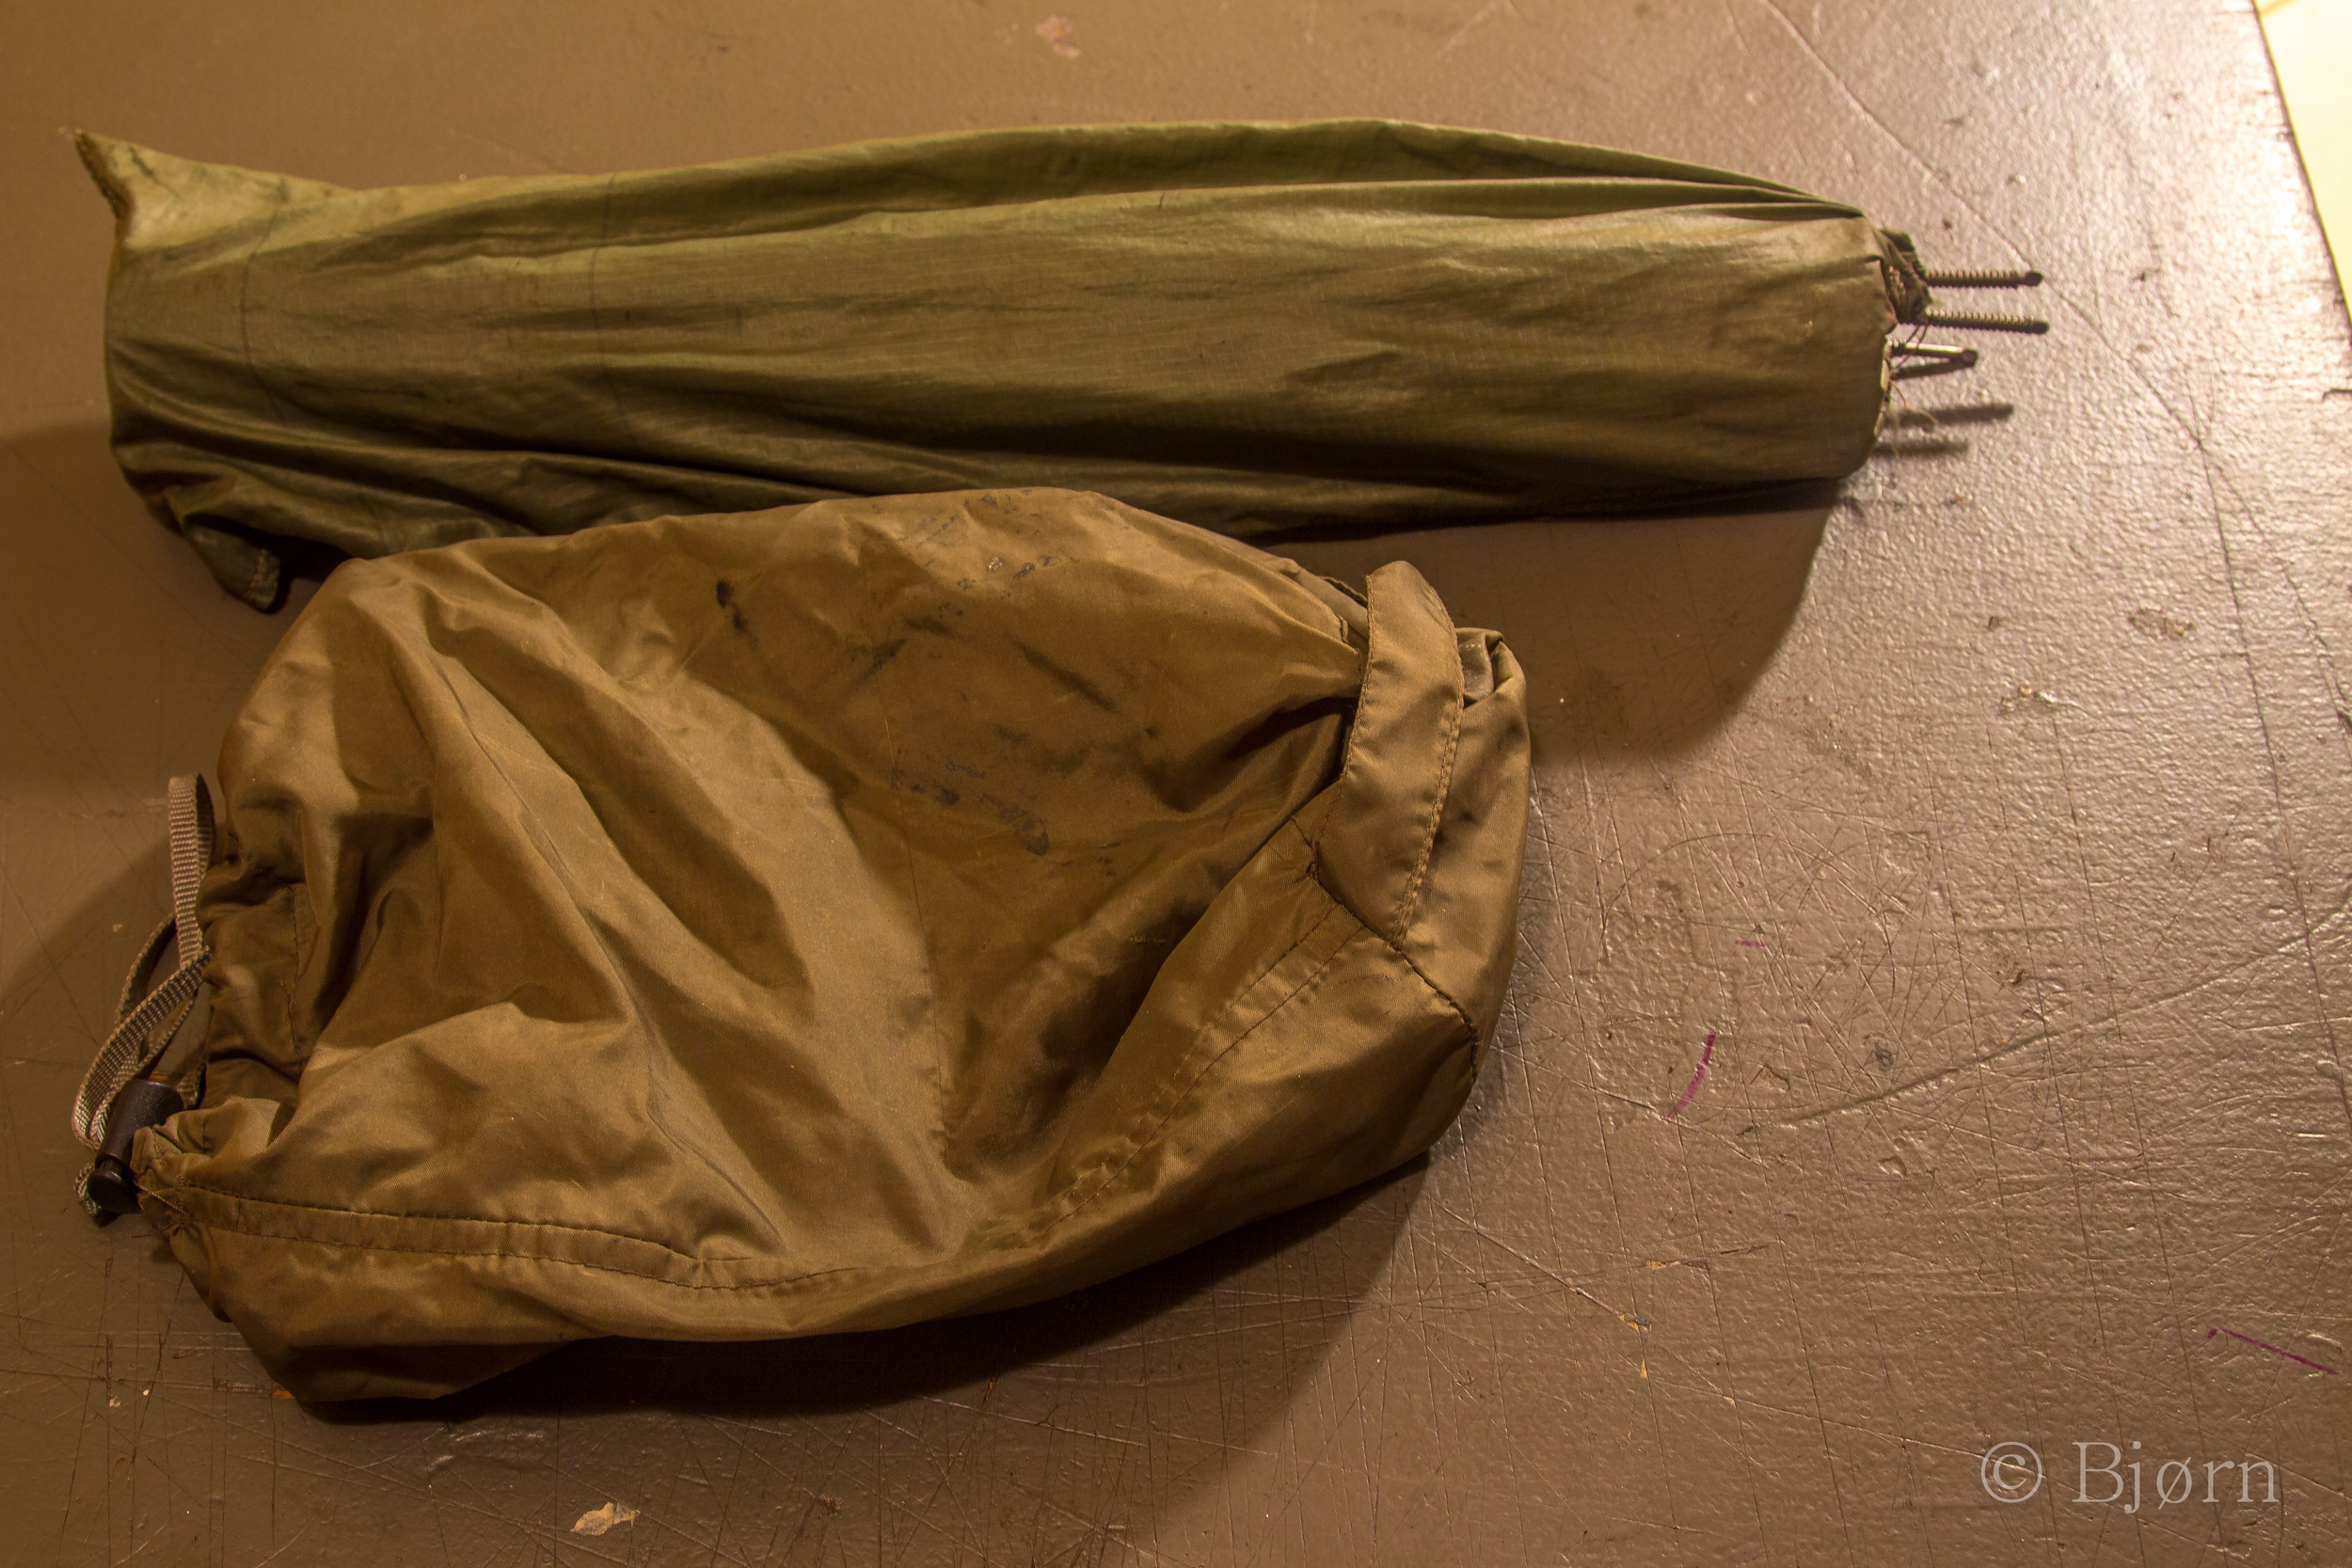
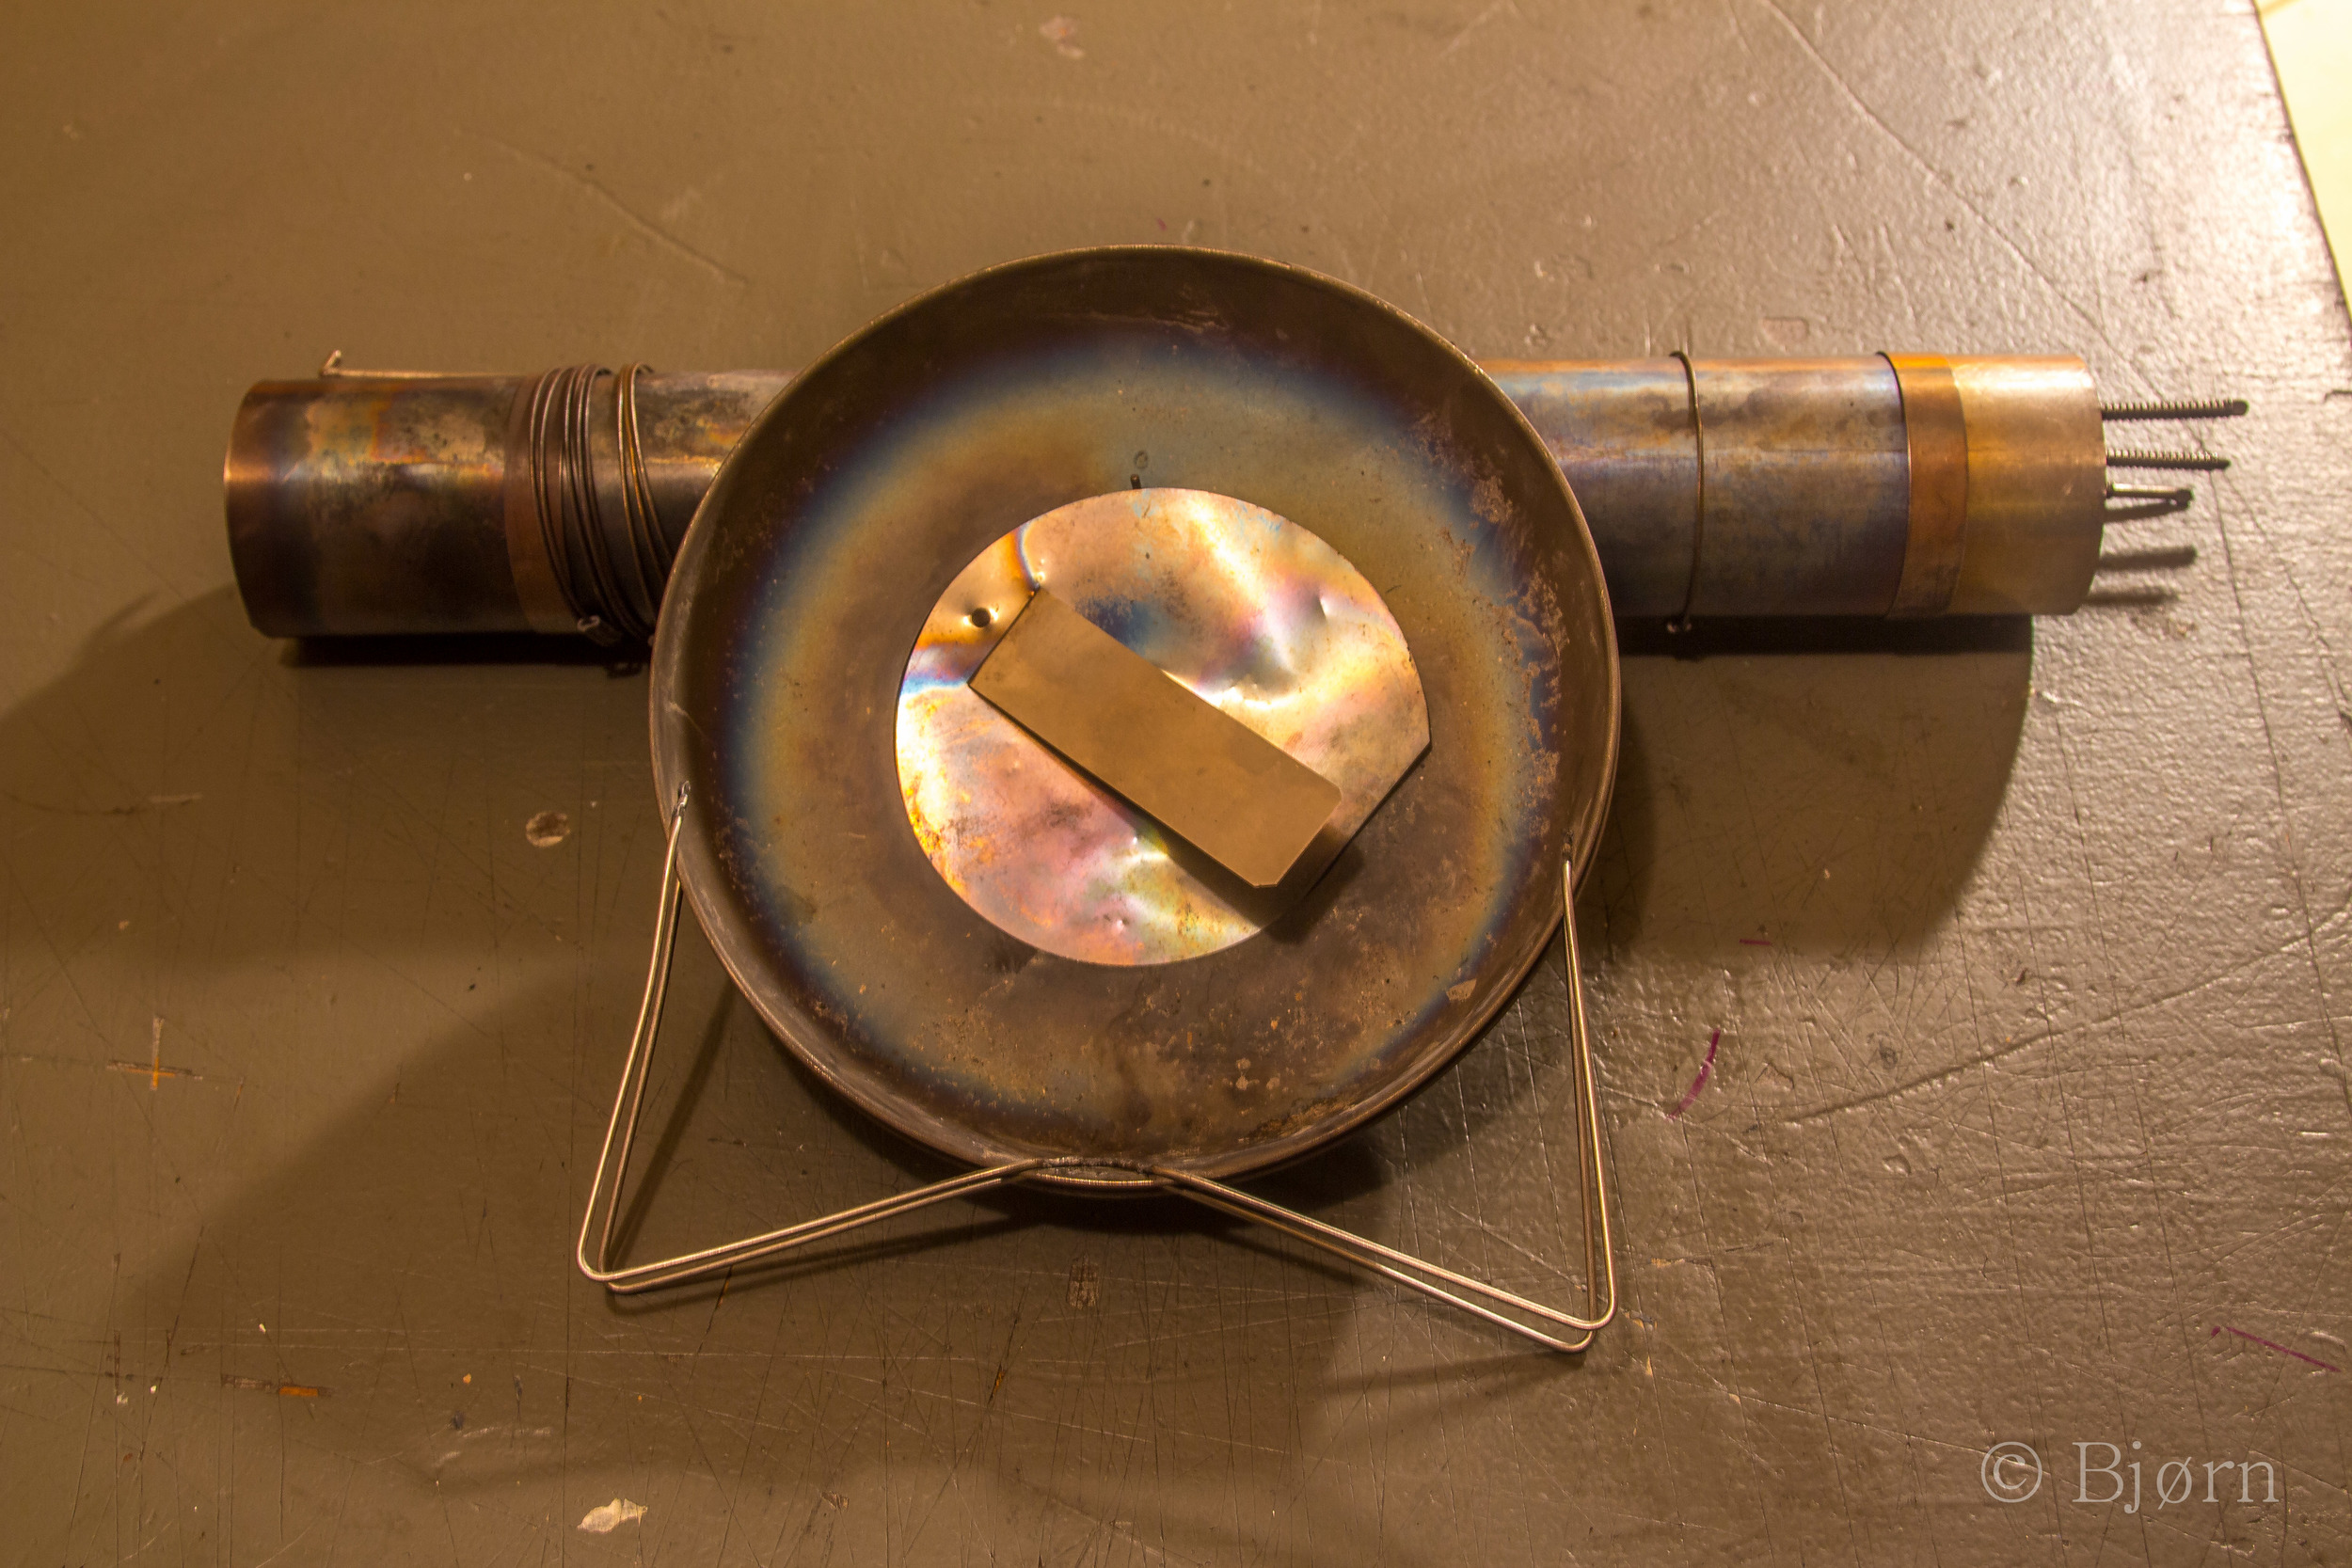
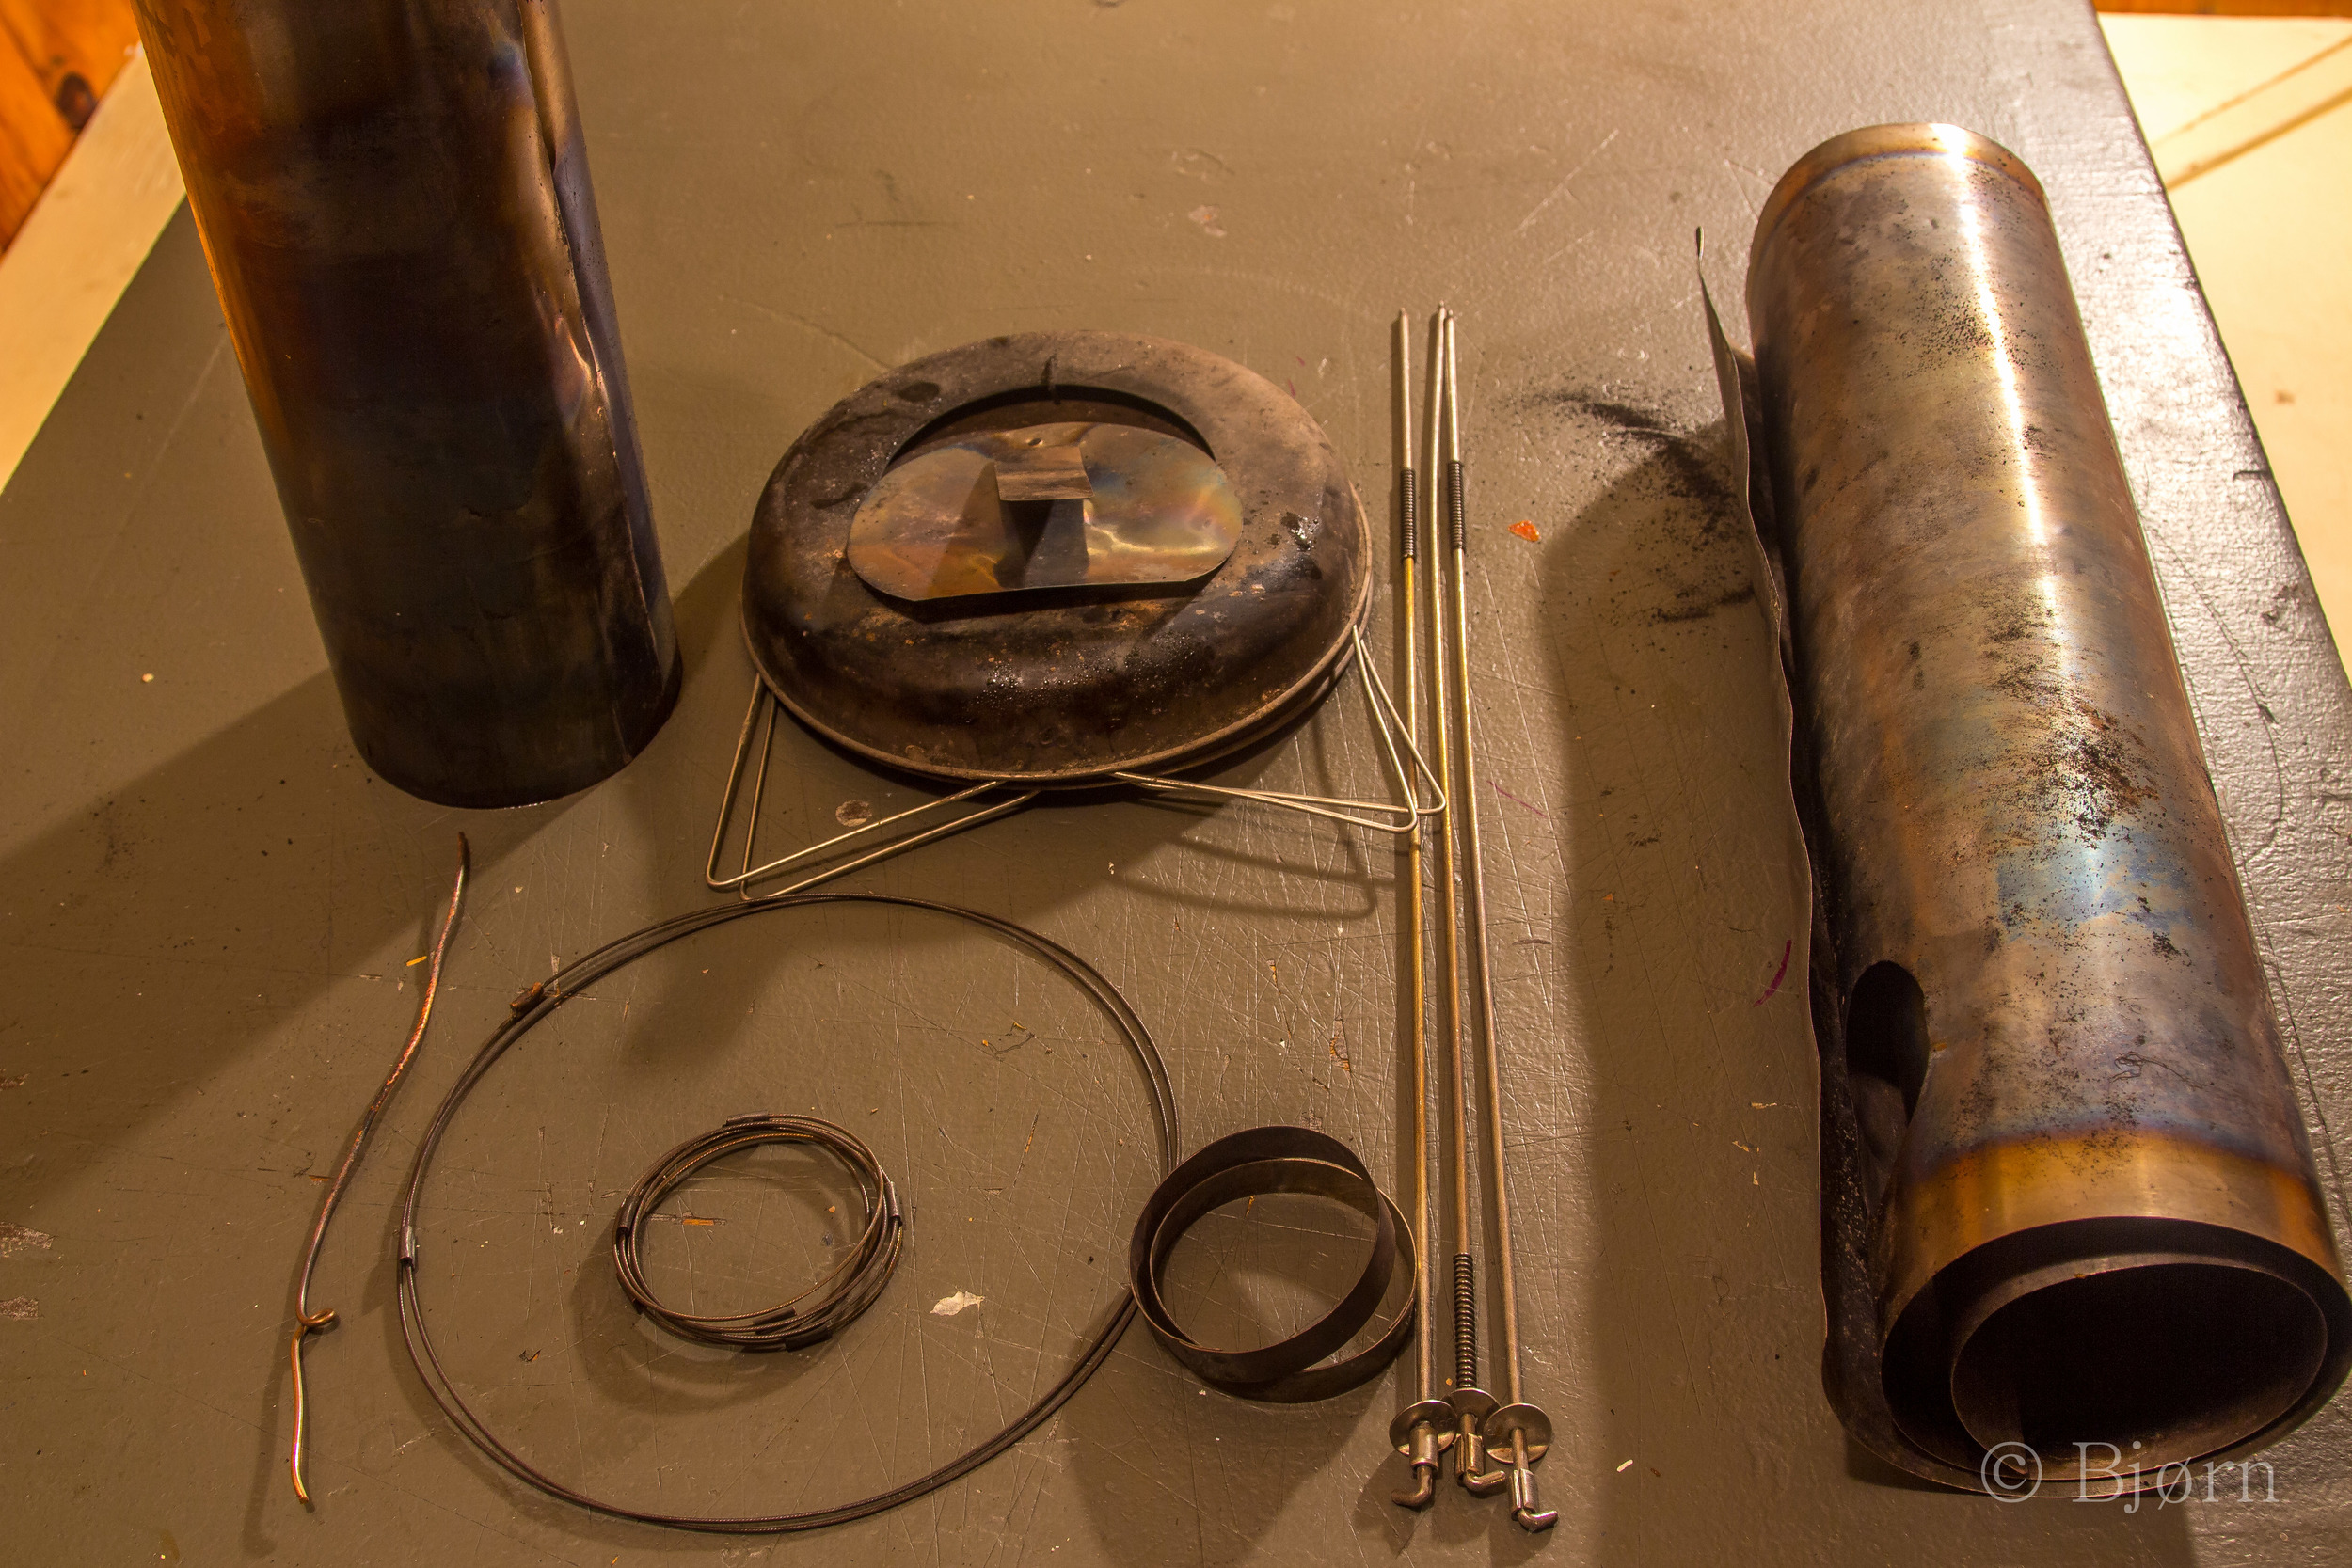
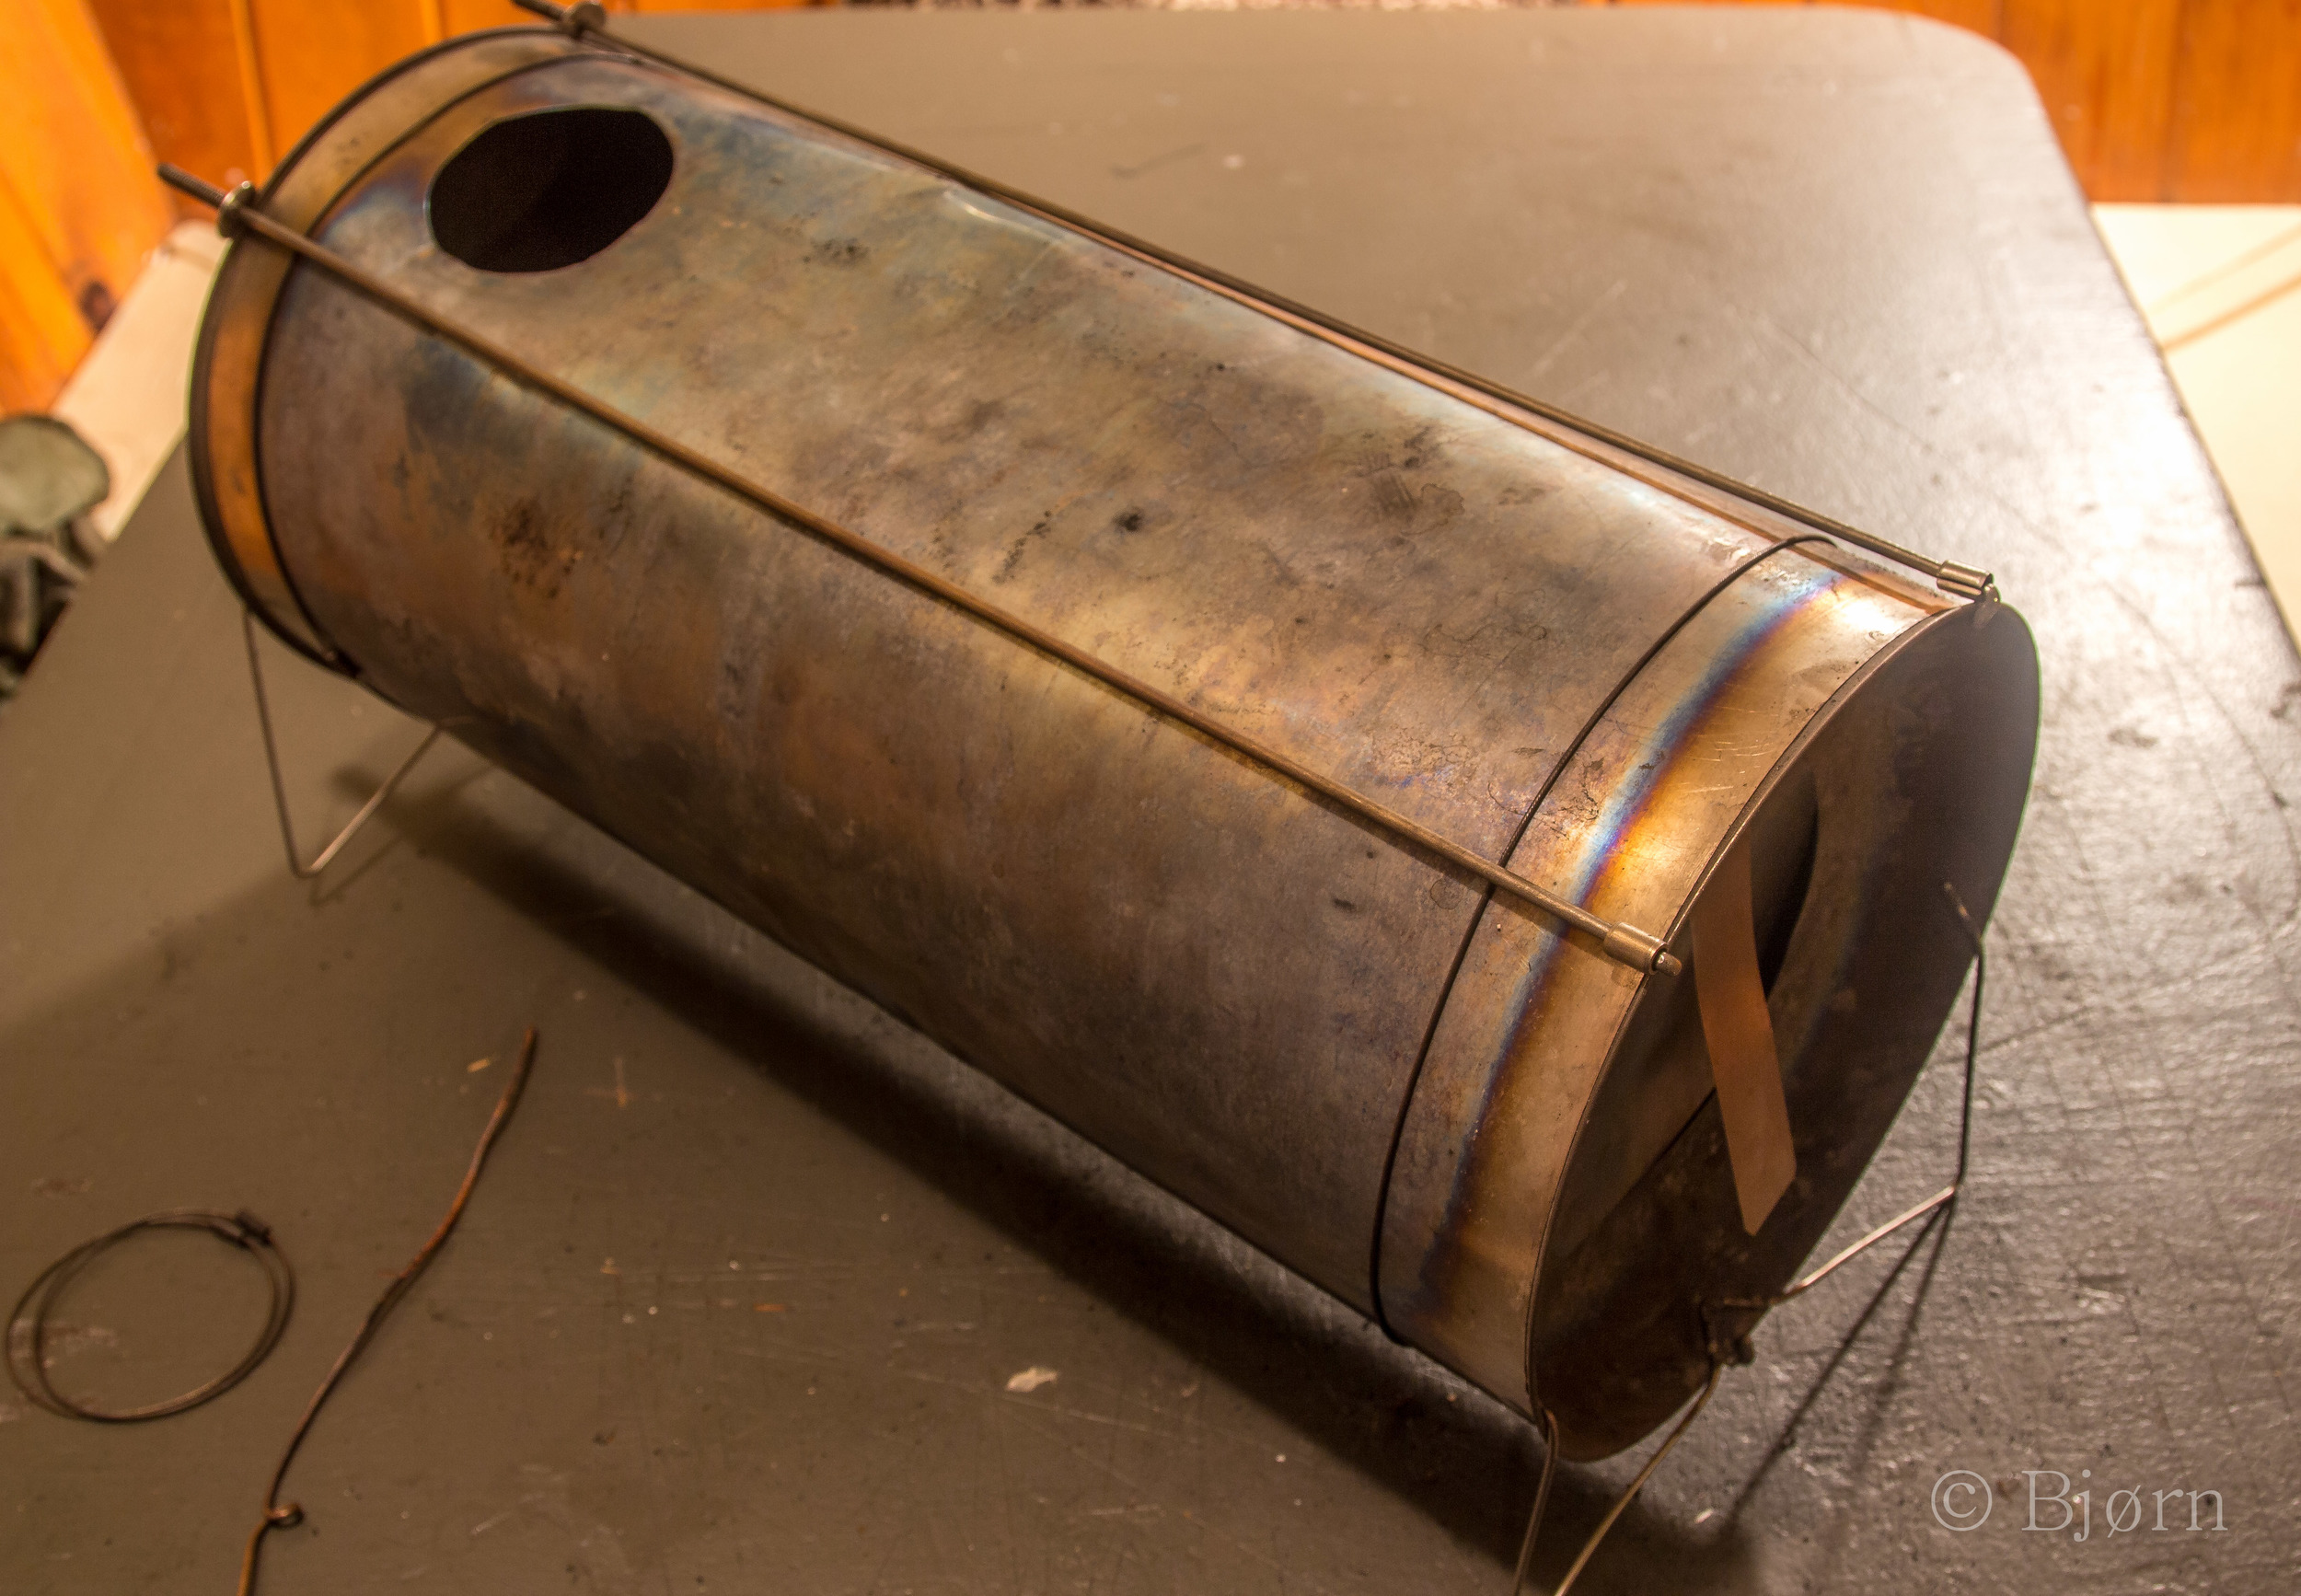
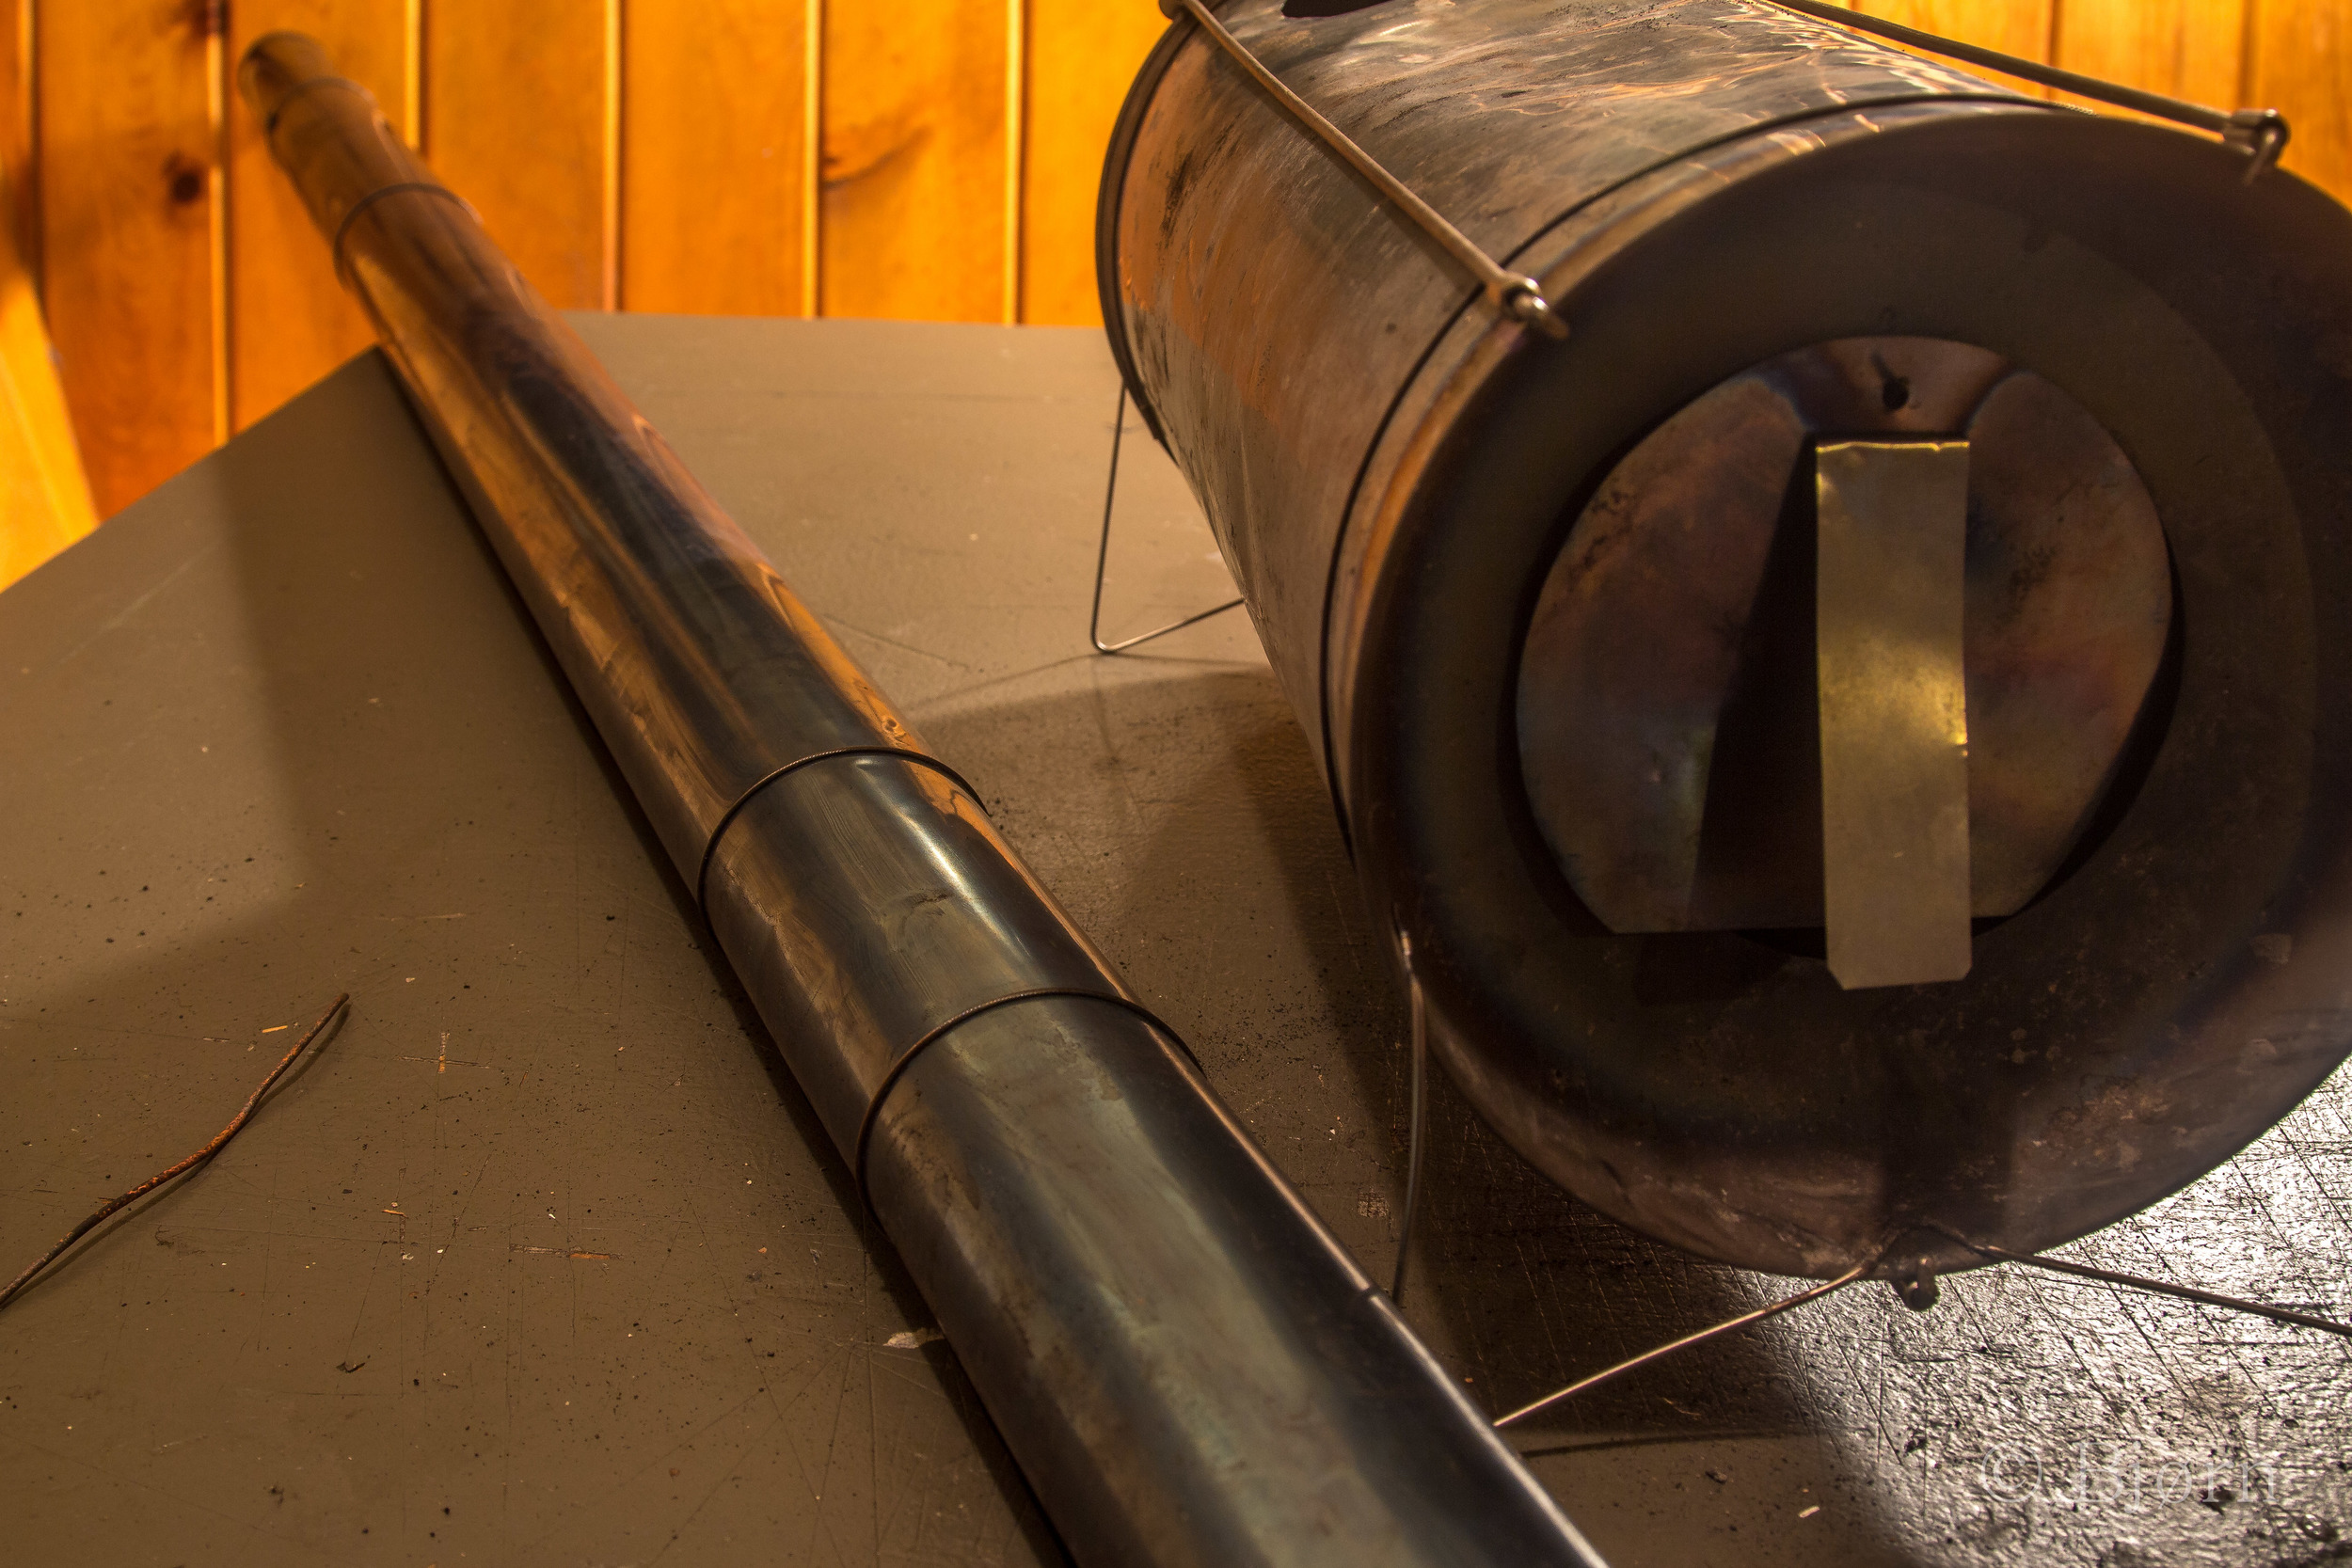
Simultaneously, the other person would lay out the inside of the shelter with sleeping pads and begin setting up the stove. The collapsible, two-pound, titanium woodstove takes a little practice to set up efficiently. Thankfully, our trip began with unseasonably warm temperatures. By the time we experienced our first evening of -20º we were well organized and stove assembly was a painless task.
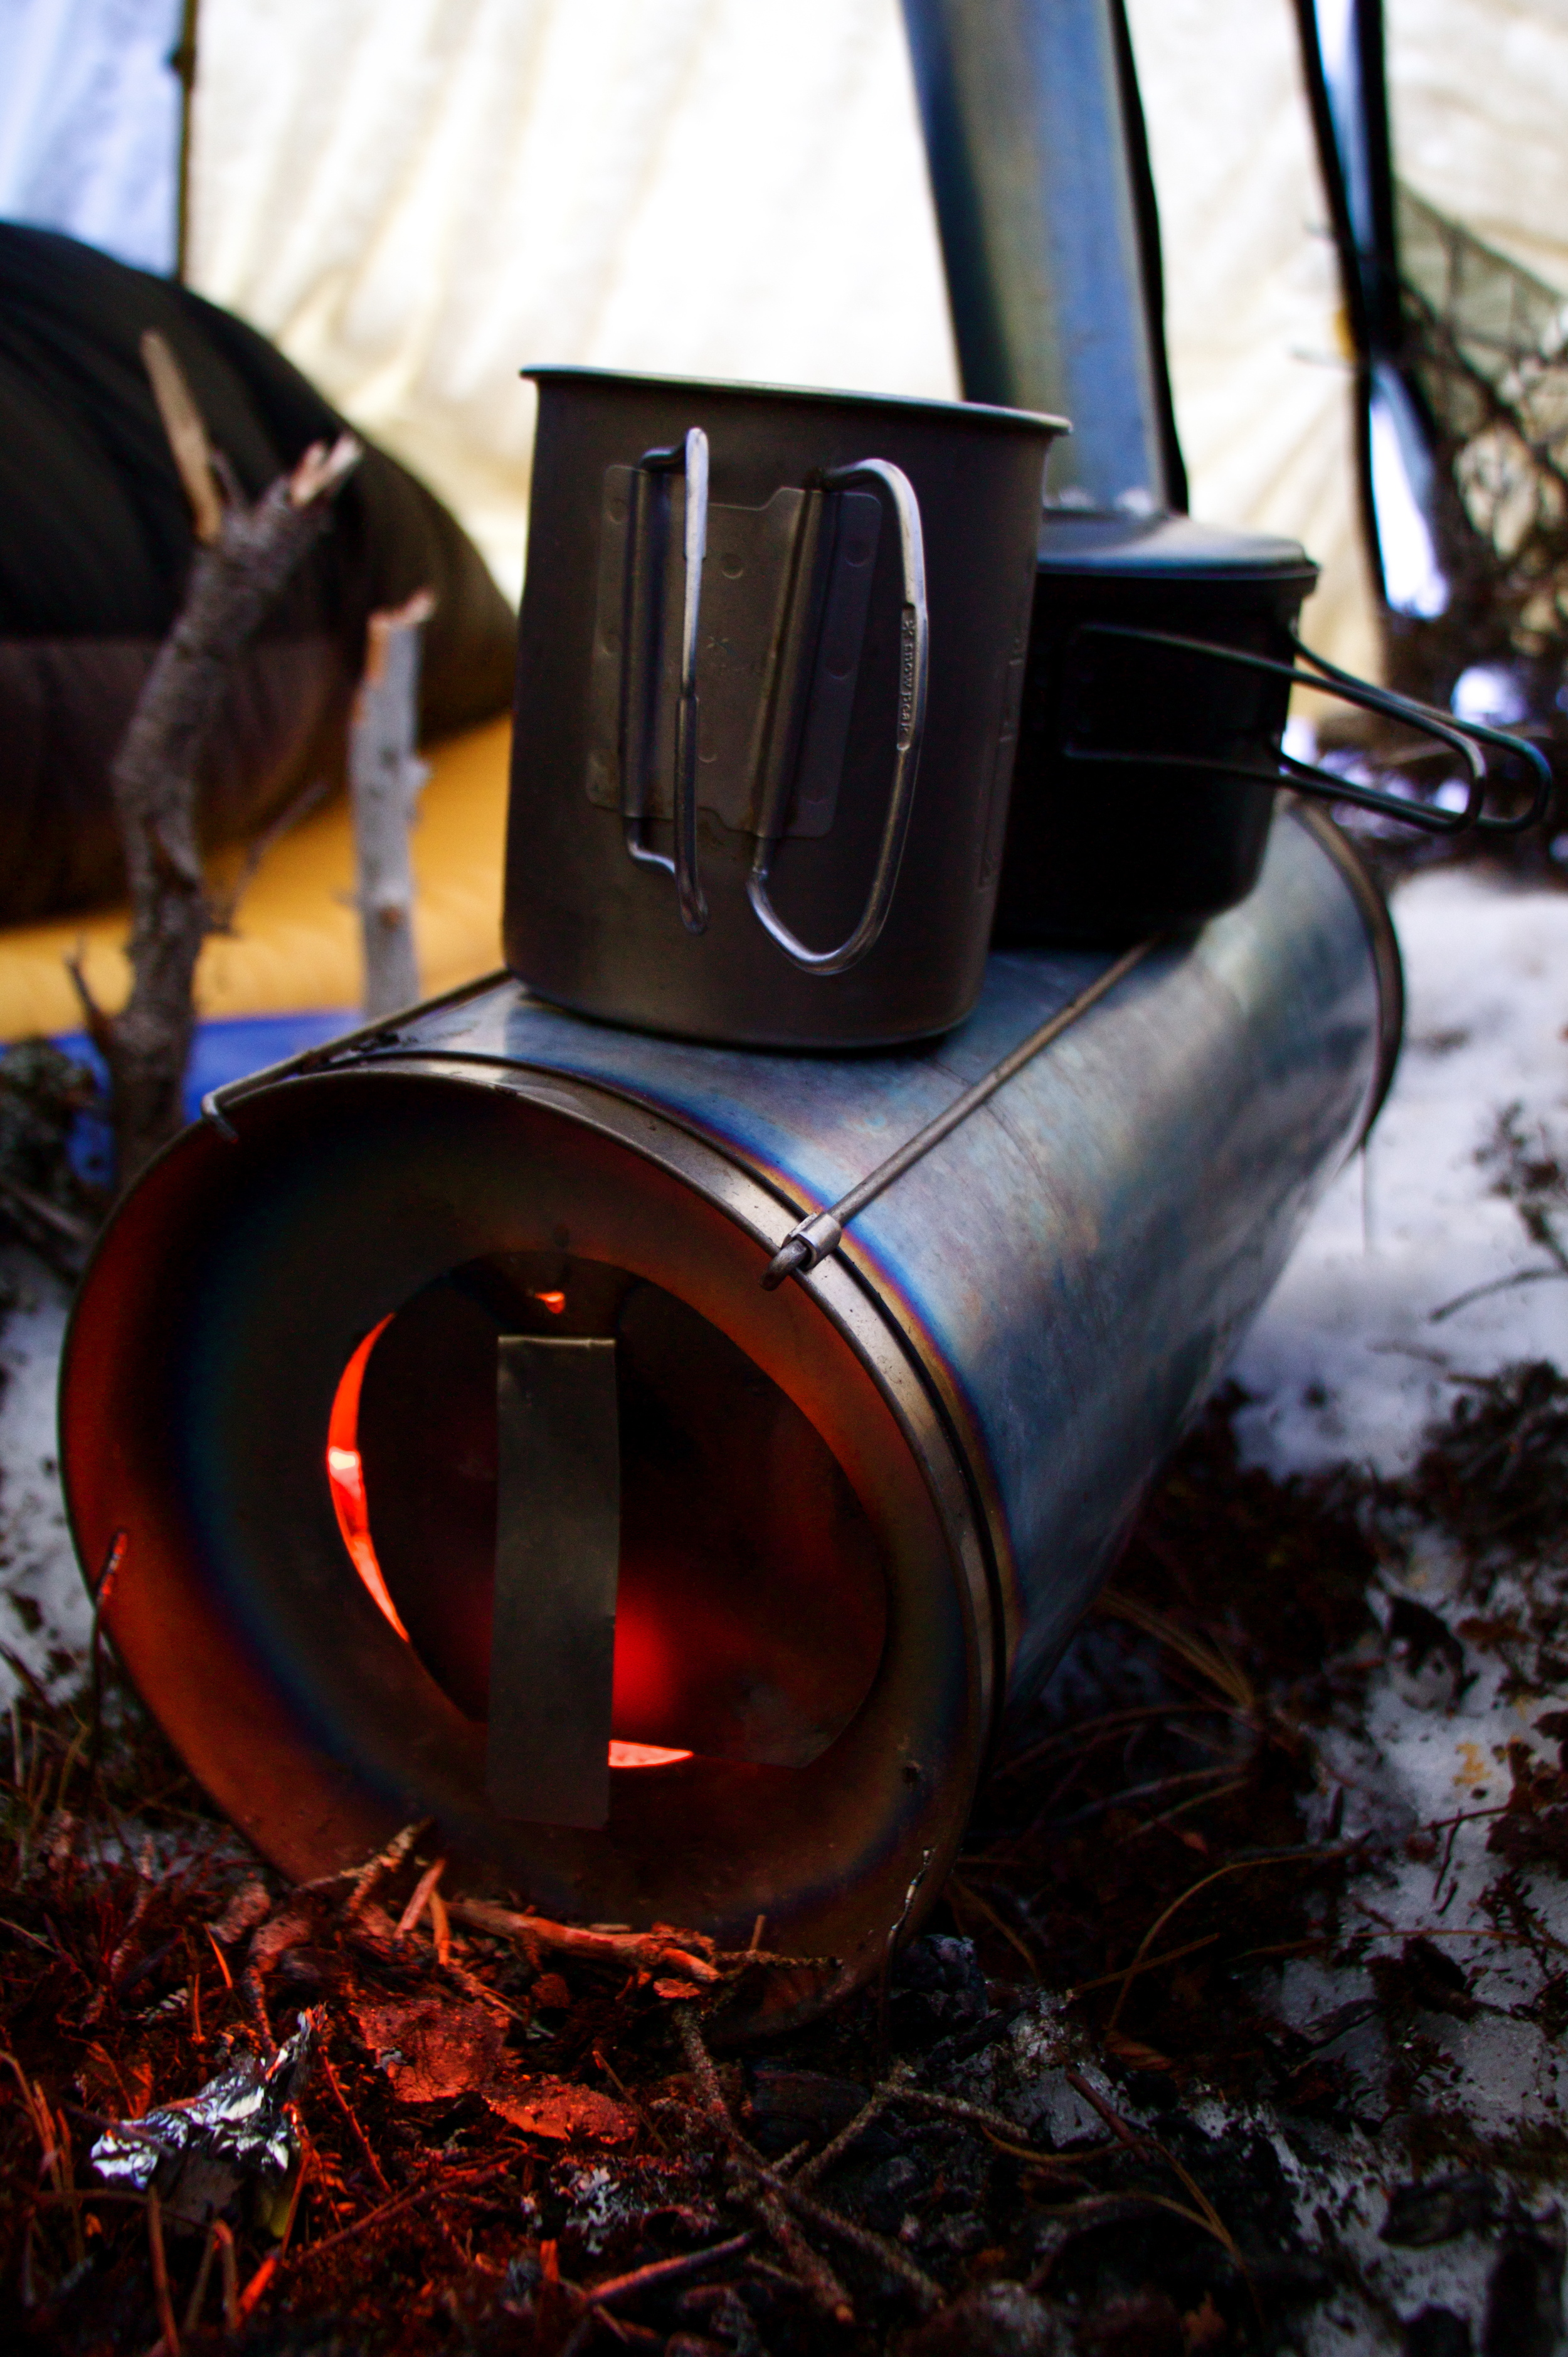
I always bring a paperback book on trips. This time it was ‘Homage to Catalonia’, by George Orwell. Every page that has been read becomes the evening fire starter. As soon as the fire was lit we would fill the pot and mug with snow, add a little water from the thermos and begin the task of making hot drinks, dinner and water for the evening and next day. Rarely, if ever, was there a time, when the fire was going, that one or two vessels was not on the stove. Once dinner had been consumed and water made we would crawl into our bags and let the fire go out.
In the morning, whoever had been to one to make dinner (‘cookie’) woke early, relit the stove, started coffee, water and breakfast. This lead-time on the morning fire was perfect for many reasons: drying the shelter of frost and moisture from the sleeping bags was resolved and by the time coffee and breakfast was ready, gear and clothing were warm and dry. Even in -20º, we were able to comfortably do our inside chores glove free, in our long underwear.
We eventually learned some handy tricks involving the stove that made life better. By placing spruce boughs under the stove and piling snow around, we were able to keep the stove from melting down into the snow. Willow branches also worked. When disassembling the stove in the morning, we dumped the ashes and embers in a pile outside. Before we were ready to ride, we would warm our hands for one last time on the embers before smothering them. Starting the day with warm hands is a remarkable treat.
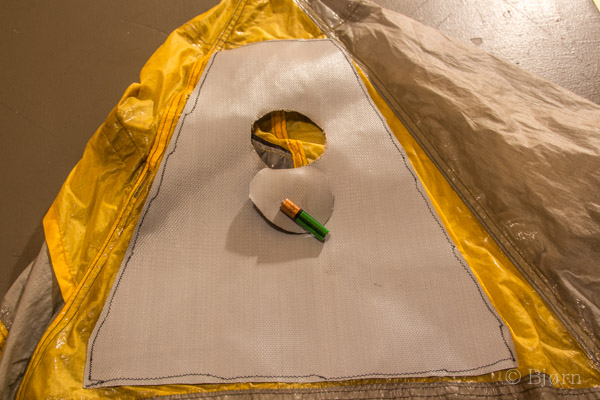
There are very few downsides to the woodstove but it’s worth mentioning them and hopefully they will be resolved before our next trip. The most negative aspect of the woodstove, in a sil-nylon shelter is obvious – embers. Most of the embers that made it out of the stovepipe either burn out or were blown away before they came in contact with the nylon but after 5-weeks of use, there are more than a handful of little holes. Whenever we slept in a cabin, I would bring the shelter inside and sew up the holes. Most were smaller than a pinhead but a few were pinky diameter.
I would like to experiment with a spark arrester, which could be a piece of fluffed steel wool. Maintaining a good draw is very important so this method would require experimentation.
The other drawback to the stove is that the actual barrel is made of very thin titanium. Over the course of the trip, this material became malformed from setting the pots atop it. Titanium Goat has another stove design that turns this concept 90º, with the thicker, non-bendable titanium on the top and bottom and the thinner sheet metal on the walls. However, our barrel stove was remarkable and improvements, in this case, would be nice but not necessary.
Saws:
We carried two saws and one 21-inch replacement bow saw blade, which we never needed. The primary woodcutting saw was a Coghlan’s, folding bow saw. Our other saw was a T handled, stainless steel Gerber, with finer teeth. For us, these two saws complimented each other and we used them both, most days.
The Coghlan folding saw is a lightweight, aluminum “bow saw” saw with two pivot points and a very simple and secure tensioning apparatus. Once the saw is assembled the blade is very taught and thus, it cuts extremely well. On a few nights we opted to sleep in shelter cabins. Trail ethics dictate that you leave the shelter better than when you came, so we always tried to replenish more wood than we burnt. Within most cabins, hanging on a nail, are conventional bow saws with longer blades than ours. Because the tension on these saw blades is not taught, we almost always preferred ours.
The T handled saw had multiple purposes, but mostly it lived inside the shelter and was used to shorten pieces of wood, as needed. We also used it as a snow saw to cut blocks for anchoring the shelter when the snow was compact and would bring a few blocks inside for water making.
Both of these saws are light, compact and effective. Since there are pivot points on the folding saw, I carried some replacement hardware and I did replace one pin with a bolt and a locking nut. I see no reason to improve or change anything about the saws for future trips.
Airlite Snowshoes:
Because of our strange winter, here in Homer, we were never able to give our Airlite Snowshoes a proper test before we left. During our trip we experienced only one storm. Thankfully, not much snow accumulated and we were always able to ride. However, having the snowshoes is insurance and we never debated sending them home.
Because of our stove, we always needed to camp near wood. One evening on the Yukon River we were ready to camp but the trail ran straight down the middle of the massively wide river. Finally we decided to march at right angles off the trail, to the bank and camp. Kim decided to try the snowshoes for the ¼-mile bike push and I tried the Alpacka ‘sled’, without snowshoes.
Unpacking the snowshoes, blowing-up and pumping, with a bike pump, takes around 5 minutes. Once Kim was strapped in, she began pushing and was able to fine-tune her gait to avoid collision with the bike and said it felt very natural. The floatation these snowshoes provide is substantial. The snowpack in this instance was dust on breakable crust with rotten and bottomless snow underneath – terrible walking snow. She stayed on top and was able to reach the shore without strain.
Again, because of our no snow winter we never tried our Alpacka ‘sleds’ before embarking. Even though they are much less heavy than a packraft we sent them home after that evening on the river.
It may be that in certain kinds of snow the ‘sled’ would work better but in cold, dry snow the ‘sled’ offered tremendous resistance. It felt like I was dragging a 4x8 sheet of plywood over sand.
We are back to the drawing board for a lightweight and compact, emergency sled that can haul bike and gear. Since pushing the bike with the Airlite Snowshoes proved to be successful we discussed the new strategy: if riding becomes impossible - push, if pushing becomes impossible – inflate snowshoes and push, if pushing with snowshoes becomes impossible and the situation becomes dire – abandon bike, drag a dry-bag with sleeping bag and food, and snowshoe to safety. Thankfully we never had to make these kinds of choices but it is important to consider options – options that don’t include being rescued by others.
Sleeping Gear:
Up to now, we have always used a vapor barrier within our sleeping bags to prevent our sweat from corrupting the down and becoming heavy and eventually lousy with ice buildup. Sleeping in a non-permeable sack or rain gear within the sleeping bag is clammy and no fun. Up to now, vapor barriers have been the only solution - until we started using the wood stove.
We both use -20º down sleeping bags and two pads – one close-cell foam and one inflatable, air mattress.
Our shelter is floorless, so we first lay down the close-cell pad and then the air mattress atop it. This configuration is warm and comfortable and since the foam lies on the snow it never accumulates moisture. When we felt ambitious or the resources were available, we would cut spruce boughs and lay them down under the pads. For the most part, we have found this to be an unnecessary step.
I used a ¾ Therma-Rest, Z pad and a full length Therma-Rest, Neo-Air. Kim used a full length Ridge Rest and a ¾ Neo Air. Having at least one full-length pad is important because this ensures your sleeping bag is completely off the snow.
Clothing:
Body types and metabolism vary widely – this is very apparent between Kim and I. Often I am sweating and removing layers while she is adding another and cracking a hand warmer. Knowing specifically what clothing to bring is something everyone has to discover for themselves and trial and error is the only answer. However, there are some basic ideas that we both adhere to.
Layering is the primary strategy. Being ready to remove layers before you become too hot or adding them when getting cold should become instinctual.
We have included our itemized list of clothing and there is not too much more that can be said about our basic clothing but there are a few individual pieces I will discuss in detail.
I have found that the outer shell can be very thin and light as long as it’s windproof. Raingear, for me, is way too heavy and I eventually sweat. I use Patagonia Houdini top and bottom and find them to be near perfect. They protect from wind and breathe very well. I like them to be oversized so I can add as many layers underneath as necessary.
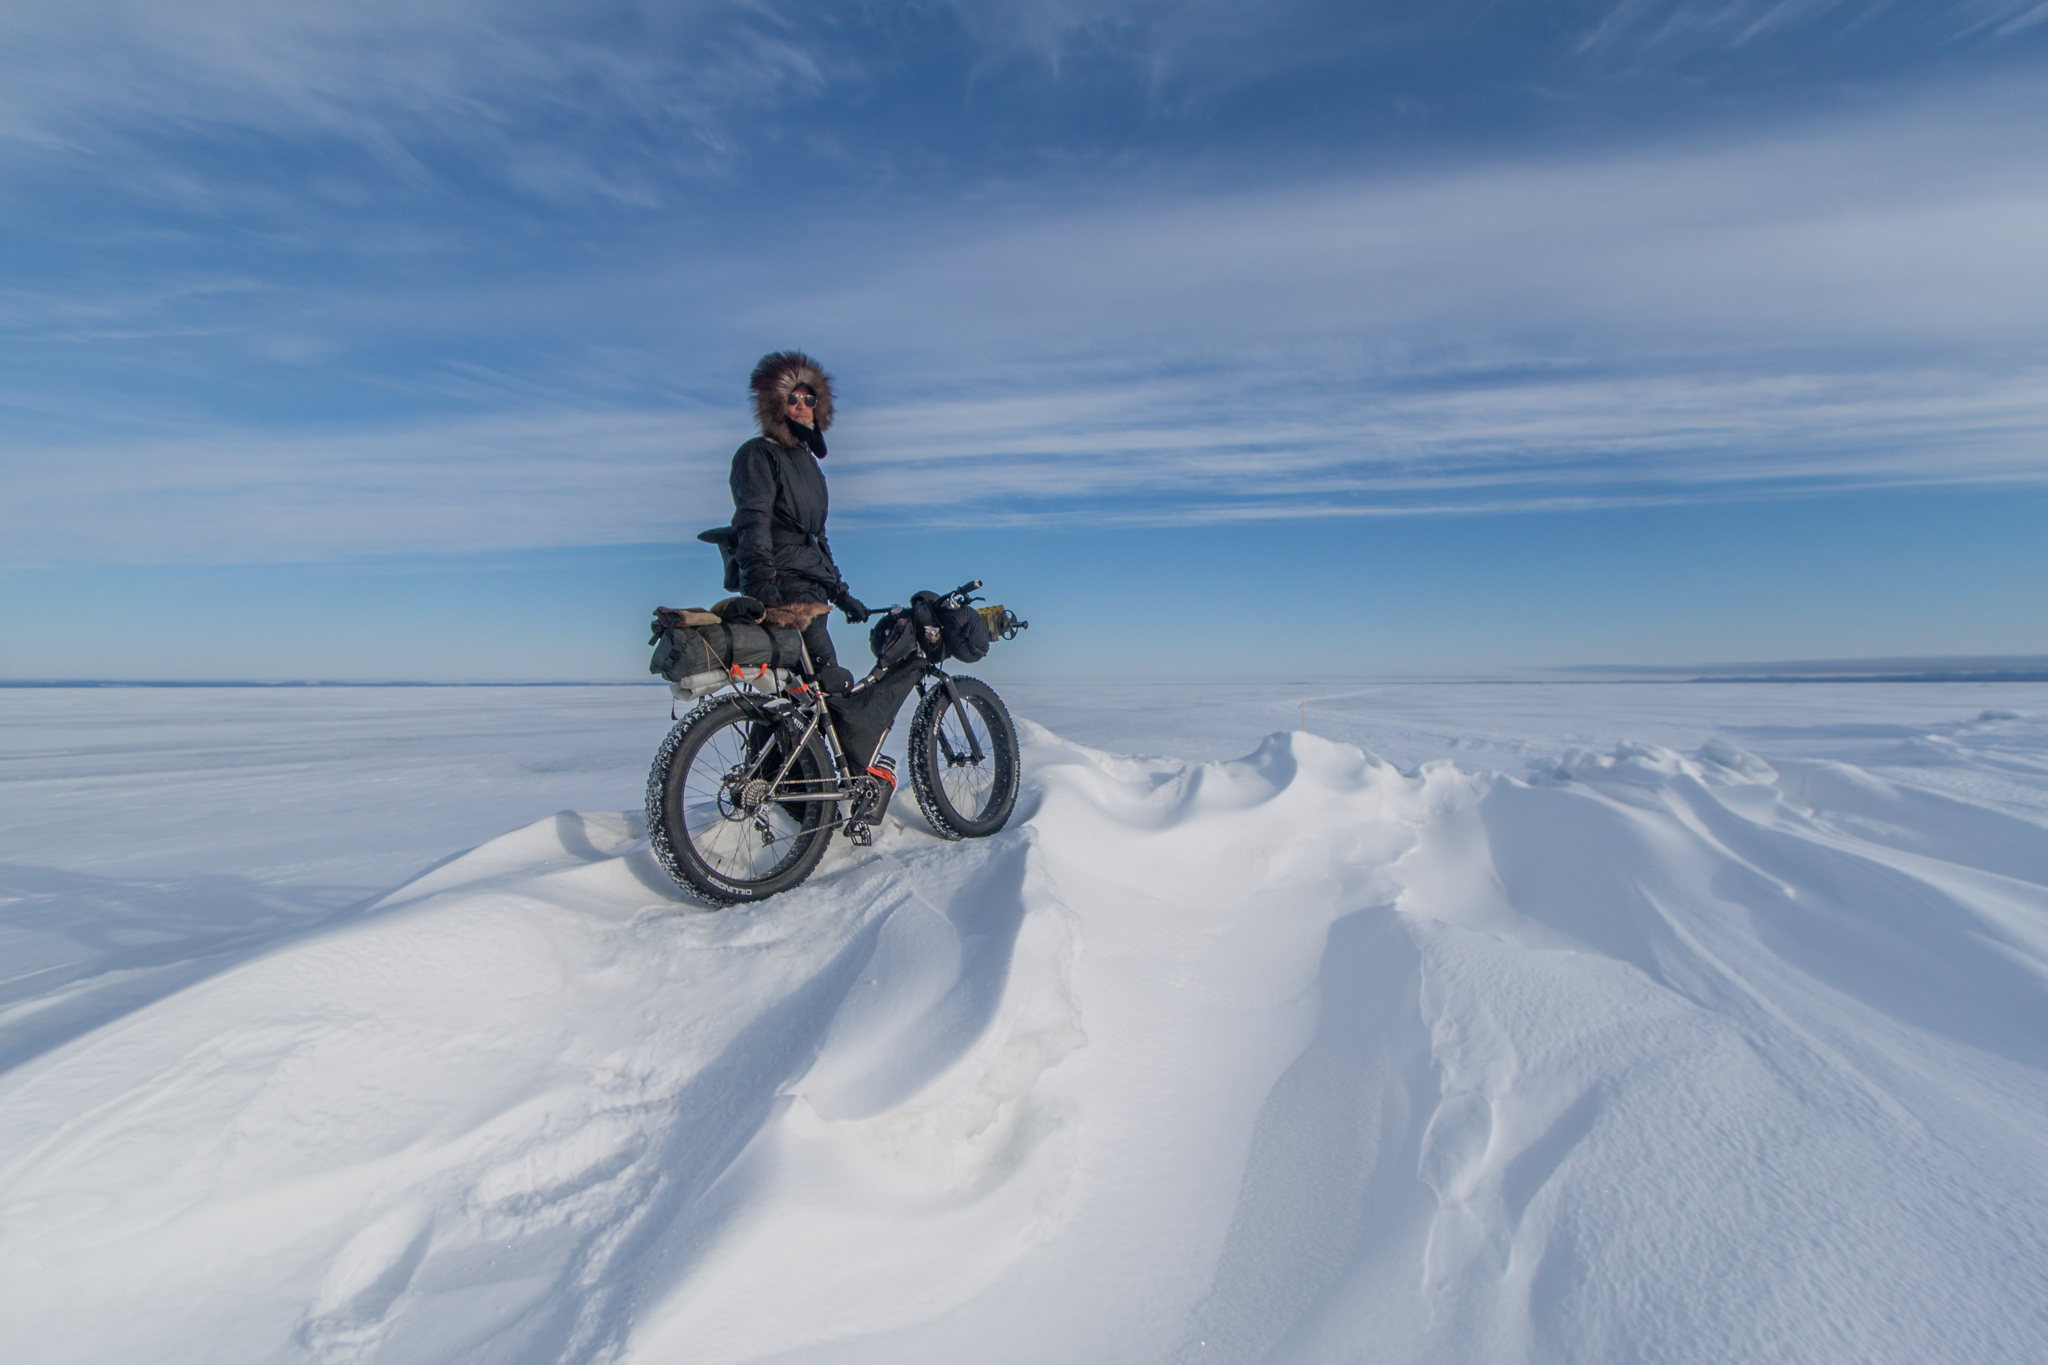
Modern hi-tech fabrics are amazing and getting better all the time but traditional Alaskan clothing also has its place on our trips. We both use fur mittens, fur saddle covers and ruffs. When the wind is blowing and it’s really cold nothing works as well as fur. I used wolverine for the ruff on my windbreaker, seal mittens and beaver saddle cover. Kim used wolf for her ruff, beaver mittens, a sheepskin saddle cover and a rabbit fur hat. A remarkable feature of fur is that moisture freezes onto it but rather than permeate, it breaks off and is as good as new without excessive care.
Proper footwear is tremendously important for winter cyclists. The basic idea we employ begins with a thin, wool liner sock, knee high vapor barrier sock, thick wool sock, insulated boot and a waterproof mukluk. This system keeps moisture out of the insulation from both outside, e.g. overflow and from within, e.g. sweat. One very important consideration when fitting boots is that they are not tight fitting. Frostbite is often brought on by poor circulation and tight boots are to be avoided at all costs.
Bags:
My $20 thrift store sewing machine has proved to be one of the most valuable tools I own. Before embarking on our trip, the kitchen table was transformed into a sweatshop as I labored over clothing modifications, new mittens, hats and bags for the bike.
For our bikes I sewed frame bags that fit within the main triangle of the frame. I sewed them to be as wide as possible without colliding with knees, while riding. Before we left, we sent 9 food drops along our route that each contained roughly 5 days worth of food. Fitting the bulk of that food into the frame bag was the goal. We also use ‘feed bags’ on our handlebars for our daytime snacks. Beyond needing a little more capacity, the ‘feed bags’ are great in their ease of access for eating on the go.
We each used one rear rack and had one dry-bag strapped atop of it. Mine contained clothing and the shelter. Under the rack, I strapped the snowshoes and on the side I carried the small tool kit.
On the handlebar, I used a harness system, of my own design, which carried a double end dry bag that I made from waterproof flooring of an old tent. This dry bag contained my sleeping bag, down parka, down vest and insulated over pants. Openings on both ends of the dry bag is useful, as I would pack the sleeping bag in the middle and have over garments on both ends. If I needed one or both layers, the dry bag was still centered and well secured to the harness. On the outside of the harness I sewed wide Velcro straps that held my Z-Rest sleeping pad and another small pouch that carried sunglasses and goggles.
Beyond these bags I carried a ‘gas tank’ bag on the top of my top tube and another small bag below my saddle, on the frame. These bags carried the sewing kit, small parts, twine and odds and ends for field repairs.
Tools:
Pairing down the tool kit consists of trying to anticipate what might actually happen or go wrong while underway and being reasonably prepared for a flat tire, loose bolts, ripped tent, punctured sleeping pad, etc. etc… You can never be fully prepared for everything that might go wrong but with a few multi-tools and some ingenuity many issues on the trail can be solved.
Beyond spare twine, webbing, buckles and Velcro we also carried a couple spare Voile straps. These straps were in use on our bikes to securely lash snowshoes and snowshoe crampons to the rear rack as well as lashing the ski poles together each night for the center pole of the tent. The strap also became useful for me when my oversized water bottle cage broke. Without the cage I had no good way of carrying my 64oz thermos. By padding the sharp metal of the broken cage, with a chunk of sleeping pad foam and lashing it back onto the frame with the Voile strap I was able to continue using the cage. These straps have been well proven in temperatures as low as -40º and are both useful and versatile.
Changing tire pressure on a winter bike trip is like changing gears – you do it often depending on conditions. Carrying a decent pump that moves a reasonable volume of air is important. When adding air, I would count how many pumps and after a couple weeks out was in a fine tune with my PSI.
First Aid:
Similar to the tool kit, you can never carry enough First Aid to field all scenarios but you can cover many of the likely solutions in a compact package. For us, analgesics, Band-Aids, skin cream, talcum powder, sunscreen, burn cream, tampax (for big gashes) and an ace bandage are the bulk of our little red kit and thankfully we needed to use it sparingly.
Taking care of skin is a daily chore when the air is dry and windy and the sun reflects off the snow. We used SPF 30 several times a day and in the evening applied Bag Balm. Saddle rash was resolved by using diaper ointment. (Go ahead – laugh.) Talcum powder is useful to help dry feet that have been in vapor barrier socks all day.
‘Prevention is the best medicine’ in general but especially on a long, remote trips. Listening to your body, good nutrition, rest, hydration and early detection of potential problems are important to successful fat-bike expeditions.
Technology:
Almost every community in rural Alaska has central utilities. As a result, recharging batteries is reasonable. Our technology is fairly sparse but, for us, very important. We carried a DeLorme InReach tracking device, headlamps and cameras.
The InReach tracking device ‘pings’ our location at a set interval and delivers the data to a website with a map. People who want to follow your progress can visit the webpage and see your path and current location. The device allows you to text up to 40 messages a month and ultimately it can be used to send an SOS. Being able to text is a great feature. My thoughts about rescue are to never require one. However, accidents do happen. If you ever were in a dire situation and needed help, texting someone who could call the local SAR would be so much better than hitting the SOS button and having the Air National Guard called out. But if your life depends on it – do it.
We both carried DSLR cameras, one lens apiece, several spare batteries loads of memory and chargers. Photography is very important to me and the weight of a full frame camera is not a burden. If Bradford Washburn could lug around a Fairchild F6, I can carry a Canon 5D. There is a chance that I will never cover that terrain again and I would hate to miss an opportunity to capture a great image.
We both carry our cameras in dry bags, on our bodies. The cameras typically perform well in the cold but it is important when bringing the camera inside to keep it in the dry bag while it warms. Taking it out prematurely will result fogging the glass and sensor. The same is true when going back out. I often leave the camera outside if I am only going in for a while.
Summary:
Every trip reveals insights, thoughts and ideas to incorporate into the next adventure and even though we felt adequately prepared for this trip there is always room for improvement. Listening to others and sharing advice is a way to save yourself making unnecessary mistakes but experimentation requires a willingness to fail.
There is an art to wilderness travel and each discipline comes with its own palette. Winter fat-biking is still a young pursuit, not full of bibles and stuffy codes. Adventure by bike is a noble and elegant way to experience the world. I hope this gear review is helpful.